Company Setup Tutorial
This tutorial will allow you to setup a new company after the MSDE 2000 has been installed, the IIS has been configured, the Web-Services installed, the client application installed and a new company has been created. When you start this process you have an empty database with only a sample Chart of Accounts on it (if that option was selected in the create company function). When you finish this tutorial you should be able to do functions like purchases and sales.
Bank Setup
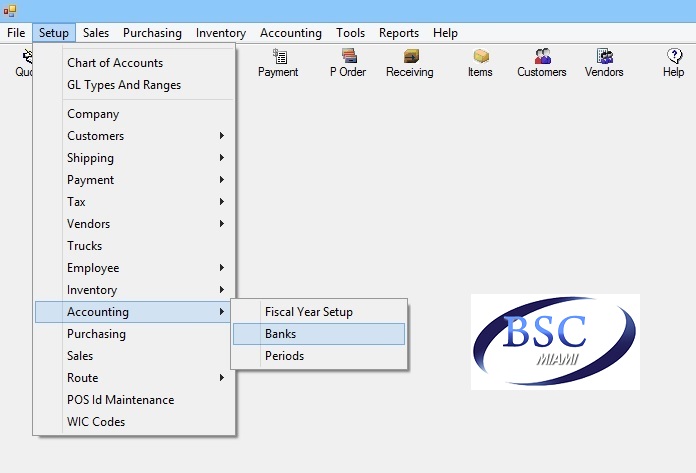
1. After you have logged in BSC Software, go to the main menu and click on Setup/Accounting/Banks
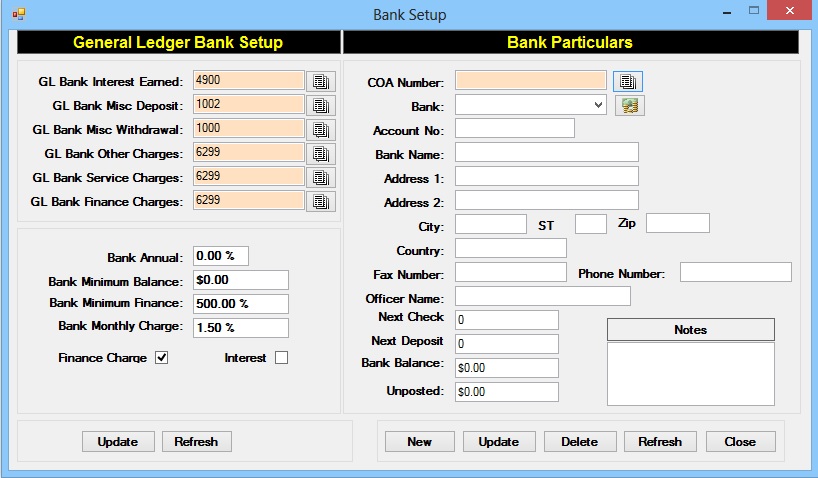
2. Click on the Search button to the right of the Interest Account and select the right Account. This account reflects all the Interest Income that you have received from your banks. This account usually carries a Credit Balance and at year's end its balance goes to the Retained Earnings.
3. Click on the Search button to the right of the Miscellaneous Deposit and select the right Account. This should be an asset account and it should carry a debit balance
4. Click on the Search button to the right of the Miscellaneous Withdrawal and select the right Account. This is an expense account and it should carry a debit balance.
5. Click on the Search button to the right of the "Other Charges" textbox and select the right Account. This is an expense account and it should carry a debit balance
6. Click the search button to the right of the "Finance Charge" text box to select the right account. This is an expense account and it should carry a debit balance
7. Click the search button to the right of the "Service Charges" text box to select the right account. This is an expense account and it should carry a debit balance.
8. Enter in the "Bank Annual" field the APR for the current account if applicable (This is done by erasing the entire box and entering the desired percentage in decimal format. Use the method for changing the Bank Minimum Finance and Bank Monthly Charge fields as well.)
9. Enter the "Minimum Balance" required on the current account. This is very common for accounts that carry an interest rate
10. Enter the "Monthly Charge" that your bank debits to your account for any concept
11. Check the "Finance Charge" checkbox if this is a credit account and finance charges are assessed
12. Check the "Interest" check box if this is a Savings account and the interest is credited every month
13. Press the "Update" button in the lower left portion of the form
14. Press the "New" button to the right of it to add a new bank account to this company.
15. COA Number: Select the GL Account that will be tied to this bank account. You can only assign one GL Account to one bank account
16. Account: Enter here the Account number that was assigned by your bank
17. Enter a meaningful "Bank Name" and try to enter as much extra information as you can about the Address, Phone and contact information of your bank in the respective fields. This will later be used in the bank reconciliation tasks.
18. Next Check/Deposit: Enter here the next check number that you have. The system will not allow you to repeat check numbers. Therefore, you have to be careful to enter the appropriate number. The information entered will be reflected when you are printing the AP checks in the Pay Many Vendors, Pay One Vendor, Receiving and Voucher.
19. Bank Balance: This text box will reflect the balance of this bank account taking into consideration all posted transactions. In order to make this number agree with your bank statement, we recommend you do bank reconciliation every month.
20. Unposted: This text box will show all of the unposted transactions that will eventually affect the balance of the Bank Account.
21. Enter any relevant notes about this bank account.
22. Press the "Update" button to save the Bank information
Setup Accounting Periods
1. Go to the main menu click on Setup/Accounting/General Ledger
2. Make Sure the "Post to GL" option is checked
3. Enter 1 for System Date or 2 for Transaction Date as the default date for the transaction postings
4. Enter the Fiscal year you will use and make sure the Start and End Dates show the right information
5. Hit the "Update" button and the "Close" button to exit the form
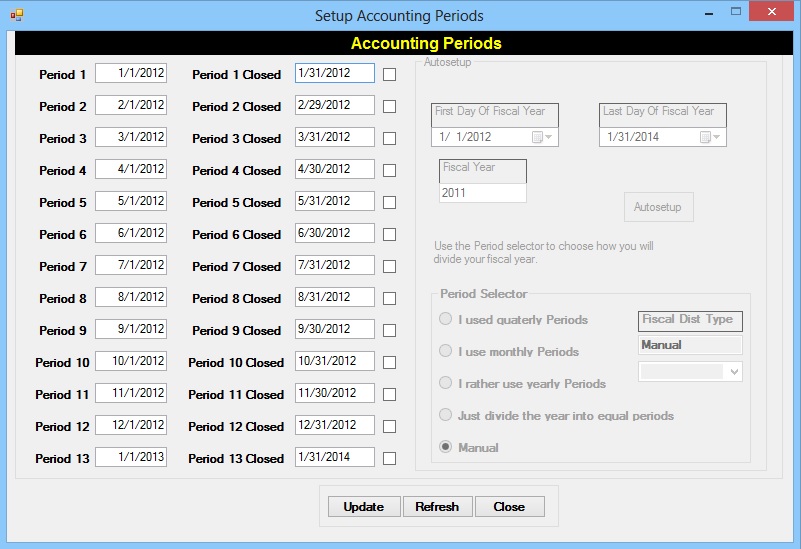
6. Go to the main menu and click on Setup/Accounting/Periods
7. Enter First day of the Fiscal Year
8. Enter the last day of the Fiscal Year.
9. Based on your company's historical information, decide what periods you are going to use. Monthly or Quarterly periods are the most popular choices. However, the system allows you to have any number of periods from 1 to 13.
10. Press the Auto Setup button. This button will automatically setup the periods on the left side according to the First and Last day of the year and option selected in the period selector
11. Press the "Update" button to save your changes to the database.
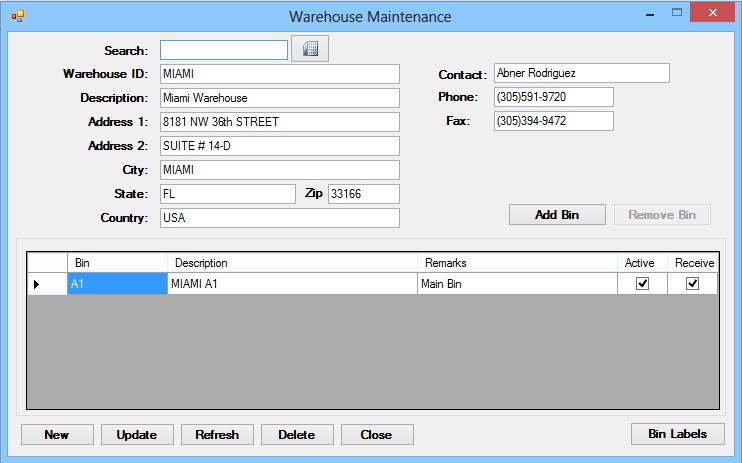
Setup a Warehouse
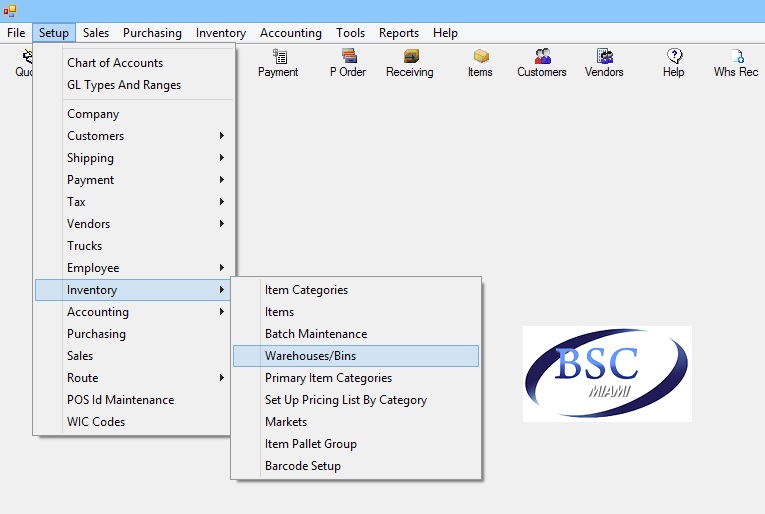
1. Go to the main menu click on Setup/Inventory/Warehouse/Bins
2. Press the "New" button
3. Enter the Warehouse ID.
4. Enter the Address, Contact and Phone Information. Even though this information is optional, you should enter the most accurate address and contact information if you will have POs being sent to this warehouse. This address will show in the PO/Receiving documents.
5. Press the "Update" button. This will create a default Bin (A1).
6. To create a new Bin, Click the "Add Bin" button and the system will add an empty line at the end of the Bin List. Enter a Bin ID that reflects its relative position in the Warehouse. For Example many companies use Bin Locations that Express a combination of Line, Location, Level (A10C). The Description should be less than 50 Characters including any special comments in the remarks. Furthermore, you can activate this bin by checking the box in its Active Column. You can also make this Bin a bin where you will accept receiving by checking the box in its Receive column.
7. Click "Update" to save to the database.
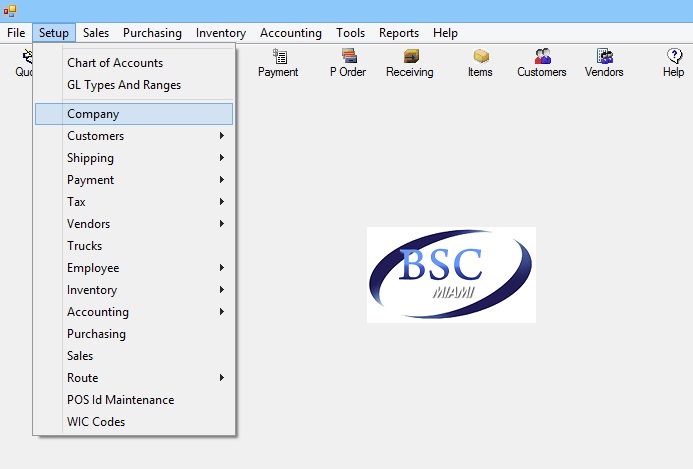
Company Setup
1. Go to the main menu click on Setup/Company.
2. Enter the company Id, Name, Address and telephone Numbers. This information will appear in the header of most of the reports
3. Enter "Days to Retrieve" Information. This field represents the number of days back information will be retrieved from by default
4. Select the default Warehouse (Required) by clicking on the corresponding Search button (the button with a picture of a folder on it) and selecting from the list
5. Select the default Bank Account from the list (Required) by clicking on its corresponding Search button and selecting from the list
6. Select the Default POS account by clicking on its corresponding Search button and selecting from the list. This is required if the company will use the POS Module
7. Select the Default Account by clicking on its corresponding Search button and selecting from the list. The system will use this account to post all cash receipts before they are deposited to the bank
8. Check the "Use Sales Tax (Y/N)" box if some customers will pay taxes in your system
7. Check the "Use Numeric UPC's" boxes to allow ONLY Numeric Item Ids in the system
8. Check the "Use Passwords" box to make some areas of your system more secure from non-administrator users
9. Check the "View All Customers (Y/N)" box to open the "Customer Account Status" Lookup showing all clients with outstanding balances in the system
10. Enter in the "Name for Expiration Date" Field any other name you want to show in your system
11. Enter optional Notes about your company in the space provided. The notes are for reference only and they do not show on any reports
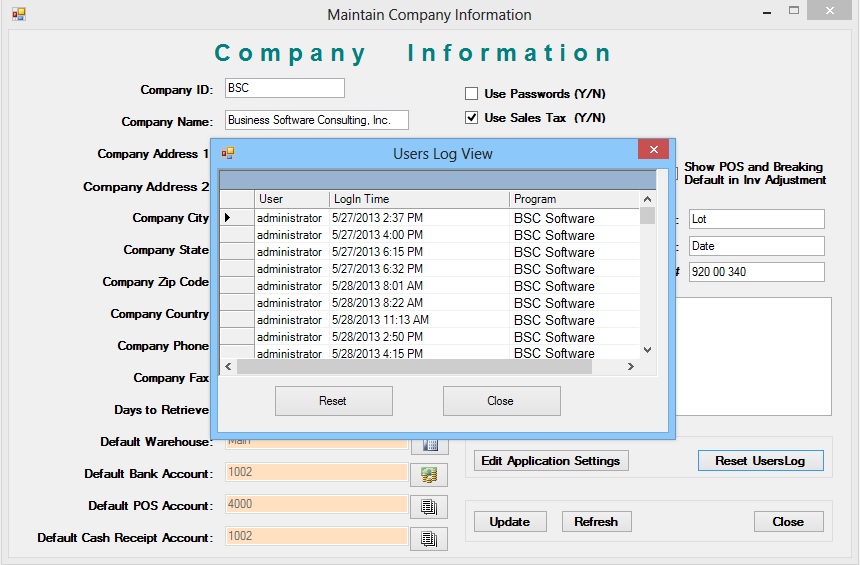
12. Use the Reset User log button to see all the users that are concurrently logged in the system. If you esteem that some users already exited the system and the list is longer than usual we advise to tell all the users to exit the system and press the "Reset" button.
13. Press the "Update" button to save your changes
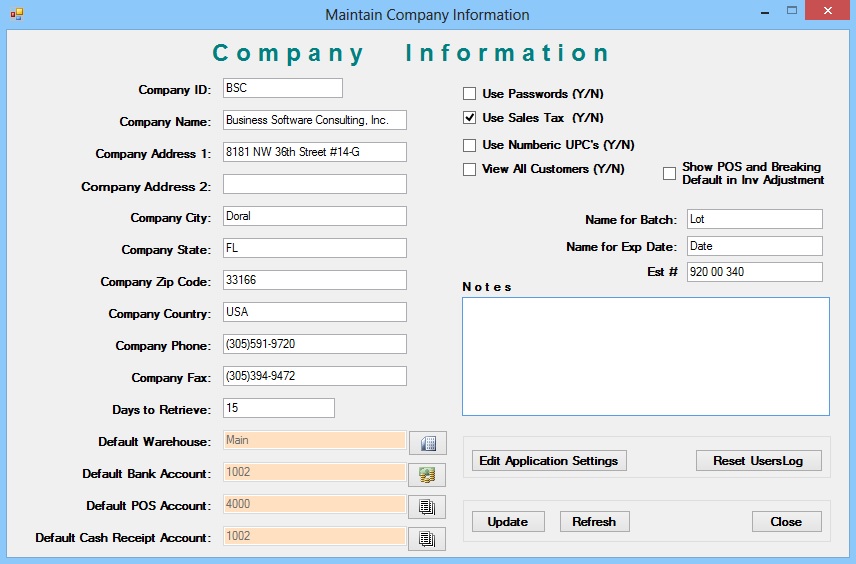
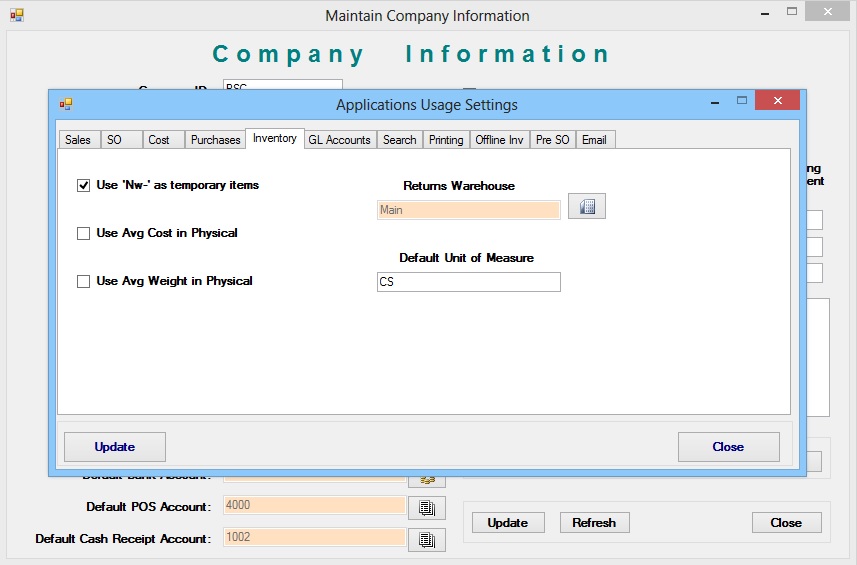
14. Press the "Edit" button inside the "Application Setup" frame to access additional settings for the company
15.Check the "Order by Bin Y/N" option to Sort Items by Bin Location in the Inventory Adjustment and Receiving form
16. Check the "View Categories with Descriptions y/n" box to show the Item Categories followed by a comma and its description in all item search forms.
17. Check the "Make Standard Cost=Real Cost" option to update the standard cost on every receiving according to the calculated real cost.
18. Check the "Use Standard Cost instead of Real cost in Sales Transactions" box to base the cost of all invoices/returns on the standard cost of the items. Therefore, the profitability and commission reports will be affected by this cost too.
19. Check the "Use Bill Back on Real Cost" option if you want the Bill Backs that are entered on the receiving of merchandise to affect the real cost of the items they have been assigned to only.
20. Check the "Include SO Items with 0 Qty in Invoice Y/N" box if you want to show on the invoice the items the customer ordered that were not fulfilled.
21. Check the "Use Category Surcharges Y/N" option to charge monetary amounts to items in specific categories if the customer Tax Group allows for it (See Item Category Setup).
22. Check the "Mark Items to be Ordered in the Sales Order by Default" box to check the "to be ordered" option whenever a new Item is added to the Sales Order.
23. Check the "Do not Allow Backorder" option to Eliminate all On order quantities associated with a specific sales order once it has been fully or partially shipped. This option also makes it impossible to ship a Sales Order more than once.
24. Check the "Print Invoices on Special Form Y/N" option to print the invoices on special forms that go directly to the default printer
25. Check the "Print Second Invoice" option to prompt the user to print an alternative type of invoice form.
26. Check the "Use Nw as Temporary Item" option so that all items which Id starts with "Nw" are treated as temporary and will not show in the price lists and profitability reports.
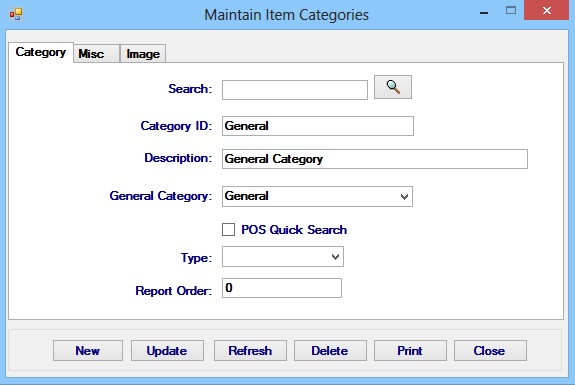
Item Category Setup
1. Go to the main menu click on Setup/Inventory/Item Categories
2. Press the "New" button
3. Enter Item Category Id and Description
4. Check the "Exclude from Sales Analysis Report" box to mark this Item Category as Non-Profitable. When the user is preparing a Sales Analysis, he can opt to include this Item Category or not if necessary.
5. Check the "Cigarettes" box to mark the Item Category as special Cigarette category. This will differentiate the category in some sales analysis according to the customer's needs.
6. Enter in the "Tax Percentage" the system will add to the items in this category. This percentage is used to markup your real cost and determine the final selling price. You can leave this value as $0.00.
7. Enter the "Order" of picking of this category in the "Picking Tickets".
8. Enter the "Code" of this Item Category. This number is used in the Salesperson Commission Report as a way of differentiating the Item Categories
9. Special Percentages: This percentage is use in the Special Percentage Report. This number has no other applications through the system. This is an optional feature
10. Enter the default Market Price for this category of Items. This option will only be valid if Price Lists that use market Price are used.
11. Select the General Category of this Item from the dropdown list
12. Select if this Item is "Dry", "Frozen" or "Chill." This will help to print separate Picking Tickets by these categories.
13. Enter a monetary surcharge you would like to assess to the prices of all items in this category
14. Press the "Update" button if you want to update all Cost-Markup Price lists and the Tax Percentage is greater than Zero.
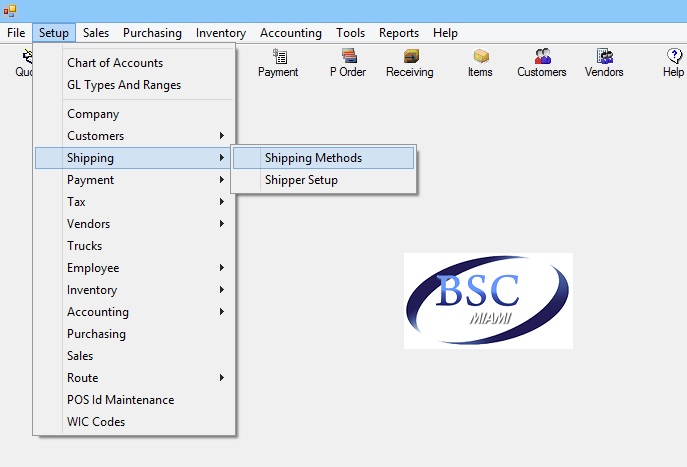
Setup Ship Methods
1. Go to the main menu click on "Setup/Shipping/Shipping Methods/
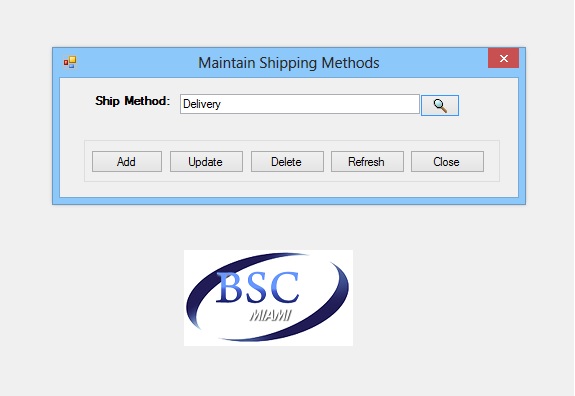
2. Press the "Add" button to create a new Shipping Method
3. Enter the Alphanumerical information
4. Press "Update"
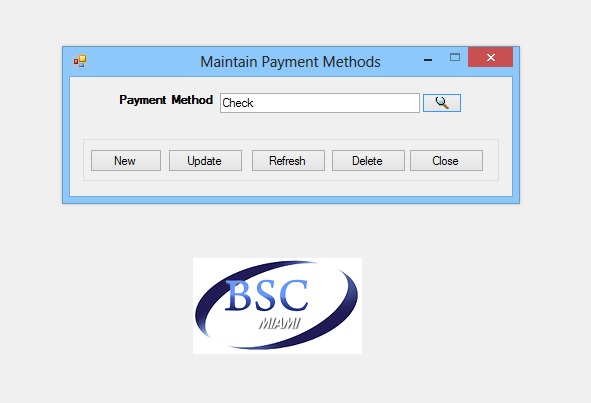
Setup Payment Methods
1. Go to the main menu click on Setup/Payment/ Payment Methods/
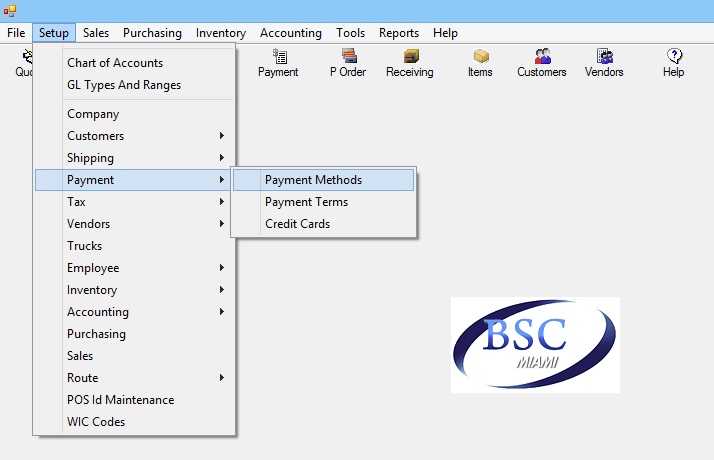
2. Press the "Add" button to create a new Payment Method
3. Enter the Alphanumerical information
4. Press "Update"
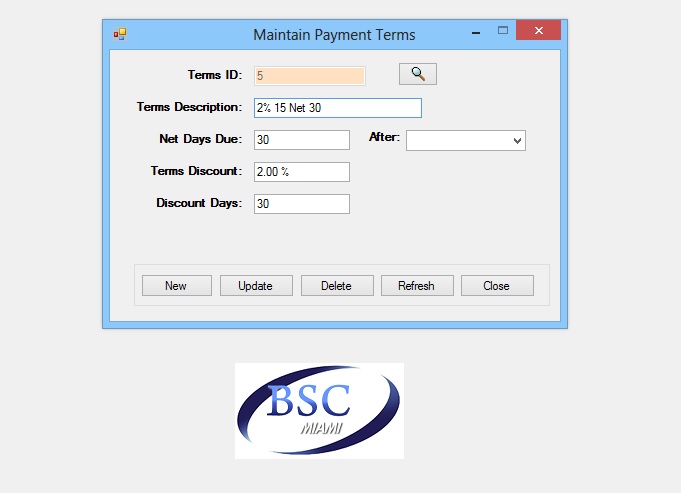
Setup Payment Terms
1. Go to the main menu click on Setup/Payment/ Payment Terms

2. Press the "New" button
3. Enter the Terms Description. We recommend that to use a descriptive name. A descriptive name is something along the lines of 2% 10 Net 30, or anything else that thoroughly and succinctly describes the payment terms. In this example, 2% 10 Net 30 means that if the bill is paid within ten days, it will be discounted by two percent; the entire bill (net) is due within thirty days. If they do not pay the entire bill by the discount date, then they must pay the entire invoice (i.e. no discounts) within thirty days.
4. Enter Net Days. This specifies how many days the customer has to pay the bill in total.
5. Enter in the "After" field the day of the week that the net days start being counted. If you want to start counting the Net days from the moment of the transaction posting, leave this field blank
6. Enter Discounts- Discount % - this tells what discount you are willing to give the customer if he or she pays the bill within the number of days specified. Change this field by selecting the entire contents of the box and replacing it with the desired percentage in decimal format then click tab or enter
7. Enter Discount Days - this is the number of days the customer has to pay the bill before the discount expires.
8. Press ""Update""
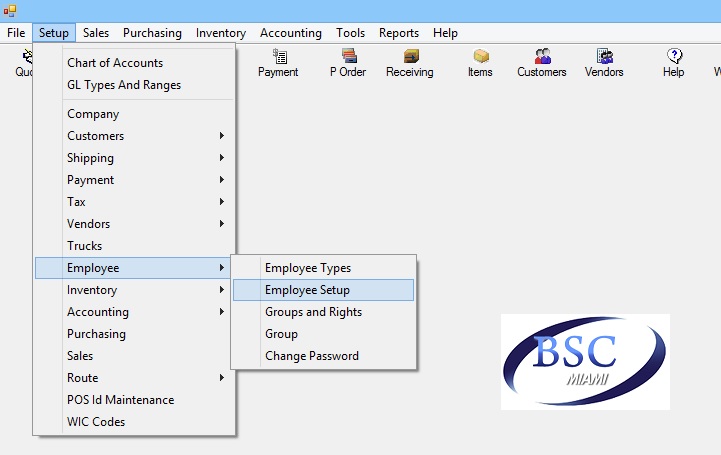
Employee Setup
1. Go to the main menu click on Setup/Employee/Employee Setup
1. Press New to Create a New Employee
2. Enter the Employee Id. The employee id should be an identifier for this employee/user of the BSC system. You can enter numbers, letters and spaces but we do not recommend the use of any special characters.
3. Enter the Employee Name, Address and Phone. The employee name is used in the system as the Login Name of the user. This field has to be carefully selected as it will show in many reports and lookups through out the system. The rest of the contact information for this user(such as Address and phone) is optional.
4. Hire Date. Select the employee hire date. This information is optional
5. Social Security Number. This information is also optional
6. Group.
7. Select the Group that this employee is part. The company is created with one default general group (000, Administrator). If you want to create more groups you need to add them the system(Group Setup) and assign the rights employees assigned to that group will have(Groups and Rights)
8. Select the Department. This Optional Feature allows you to select what in what department this employee is in.
9. Location. This allows you to associate the employee to one of the companies Locations/Warehouses.
10. Pay Type. Select "Salary + Commission" if this employee is a Salesperson. Otherwise, select the most accurate choice from the list.
11. Pay Frequency, Annual Salary, Hourly Rate, Overtime Rate. All of these fields are for informational purposes only as the BSC Software software does not include a Payroll Module at the time
12. If the employee was assigned to the "Salary + Commission" Pay type, you need to enter the Commission (%). This commission will be assigned to the salesperson based on his/her sales or profit. This percentage can be changed at any time. (See commission Report).
13. If the employee was assigned to the "Salary + Commission" Pay type, you need to enter the Disc Commission (%).This commission percentage will be assigned to the salesperson if he/she sells any items below the Minimum Profit Level (See Customer Type Setup) based on his/her sales or profit. This percentage can be changed at any time. (See commission Report)
14. Check the appropriate ratio button to decide if the commissions will be paid based on Gross Sales or Profit.
15. Check the "Warn if Items Below Reorder Point Y/N" option to show a window of all items that are
below reorder point to this employee when he/she logs in the system.
16. Enter any notes that are related to this employee. These notes will remain in his/her employee file for as
long as you want and they will not be reflected on any other area of the system.
17. Press "Update" and you will get a confirmation message saying that Your changes were saved.

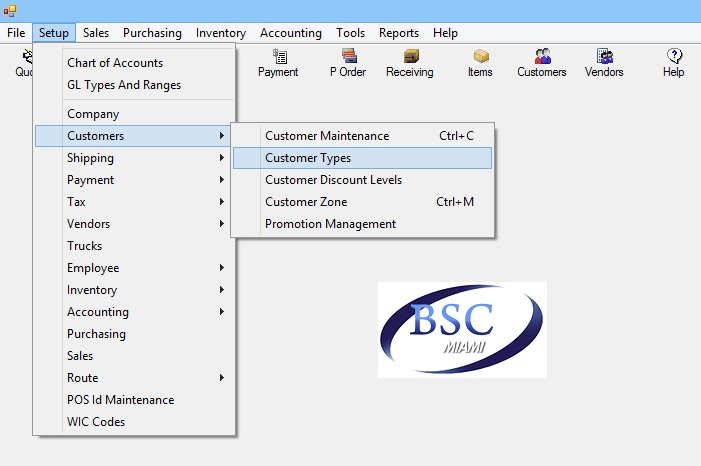
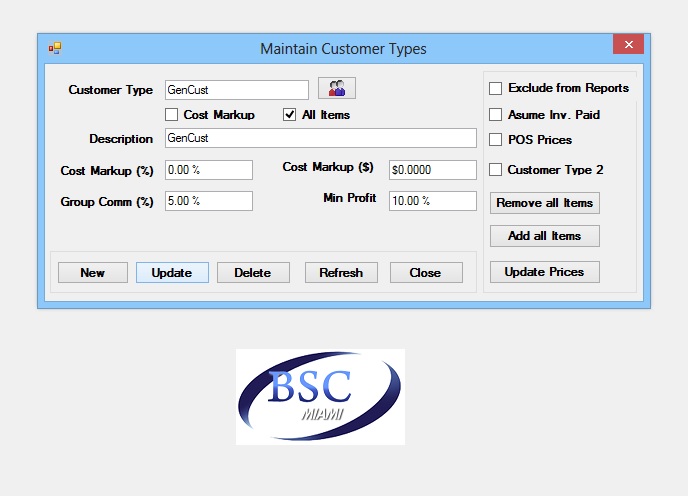
Customer Types Setup
1. Go to the main menu click on Setup/Customers/Customer Types
2. Press New to clear the fields to enter a new Customer Type
3. Enter the Customer Type Id. Enter a Unique Identifier. Use a combination of letters and numbers with less than 50 characters
4. Enter a meaningful description for the price lists in question. This Description should never be more than 100 characters
5. If you decide to make this Customer Group into a Cost Driven Price List Check the "Cost Markup" Checkbox. In addition to this, enter the percentage that will be used to calculate the prices based in the real cost of the items in the "Cost Markup" Text Box. Change this field by selecting the entire contents of the box and replacing it with the desired percentage in decimal format then click tab or enter
6. Enter in the "Min Profit" text box the minimum profit percentage management has decided to assign to this customer group. If the salesperson sells the merchandise below this percentage he/she will get a warning and the commission for that sale will be affected. Change this field by following the instructions from step 5
7. Enter in the "Group Commission %" Text box a percentage that will be added to the salesperson commission percent. This is used to entice sales to specific customer groups. Change this field by following the instructions from step 5
8. Check the "All Items" checkbox if you want any new item added to the system to be added to this price list automatically. If this is a manual price list, the items will be added at regular price. If this is a "Cost Markup"price list the Items will be added according to the Item's Real Cost and the Price List "Cost Markup %"
9. If this customer group has customers with excellent payment histories or significant size, you might want to entice your salesperson to increase your sales to them by paying them commission right after the sale and not when payment is received. Check the "Assume Invoices Paid (Y/N)" checkbox to pay commission on any posted invoices to this Customer Type.
10. Click the "Update Prices" button to recalculate all the Prices based in the updated Markup Percentage Information if this is s Cost Markup Price List. If this is a manual price list, this action will open a lookup of all the items that are part of the price list. The user then can modify any of the listed prices and press Save.
11. Click the "Add all Items" button Add All Items to add all items in the company to this price list if they are not already part of it. If this is a manual Price list all items will be added at regular Price. On the other hand if this is a "Cost Markup" price list, the items will be added to this price lists using the real cost of the item and the Cost markup % on this form.
12. Press the "Remove All Items" button if you want to take all the items from this price list leaving it empty. Therefore, any customers that were already assigned to this price list will get regular prices until this price list is again populated. This button will prompt the user for confirmation
13. Press the "Update" button to save your changes
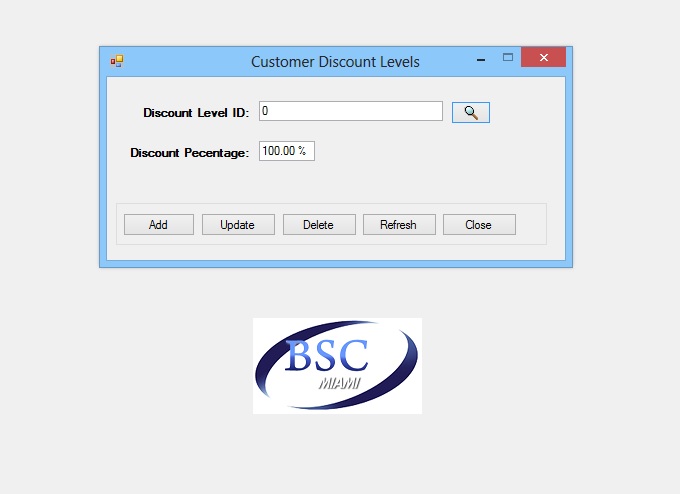
Setup Customer Discount Levels
1. Go to the main menu click on Setup/Customers/Customer Discount Levels/
2. Press the "Add" button to add a new discount level
3. Enter the Discount Level Id. Enter a Unique identifier. Even though you can enter numbers or letter in here try to enter a meaningful description
4. Enter the "Discount Percentage." Enter the percentage of the final price that you want to affect. For instance a Discount percentage of 100% will mean no changes to the final price. A discount percentage of 105% will mean the customer will get a 5% increase over his price. A discount percentage of 99% will mean that the customer will get a 1% discount over his best price before that price gets inserted in the Quote, Sales Order or Invoice. Follow the same method as mentioned above to change the percentage.
5. Press the "Update" button to save your changes.
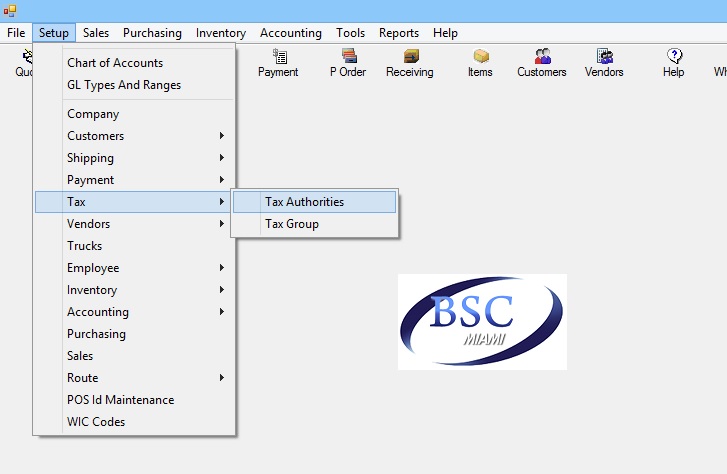
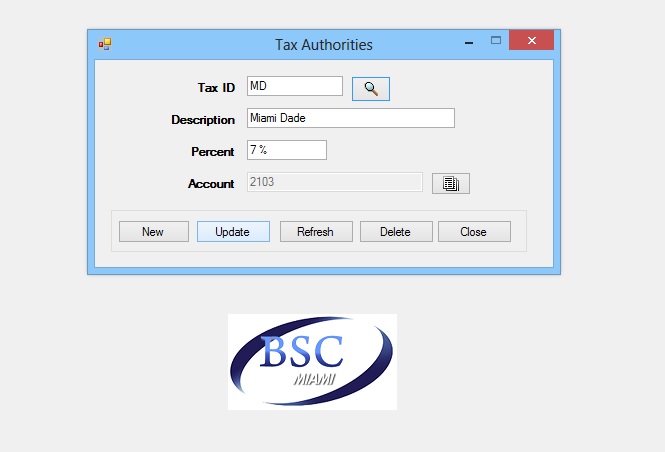
Setup Tax Authorities
1. Go to the main menu click on Setup/Tax/Tax Authorities
2. Press the "New" button
3. Enter the Tax Id
4. Enter the "Percent" amount for this tax.
5. Press the search button to the right of the "Account" textbox to select the tax liabilities account where taxes will be posted
6. Press the "Update" button
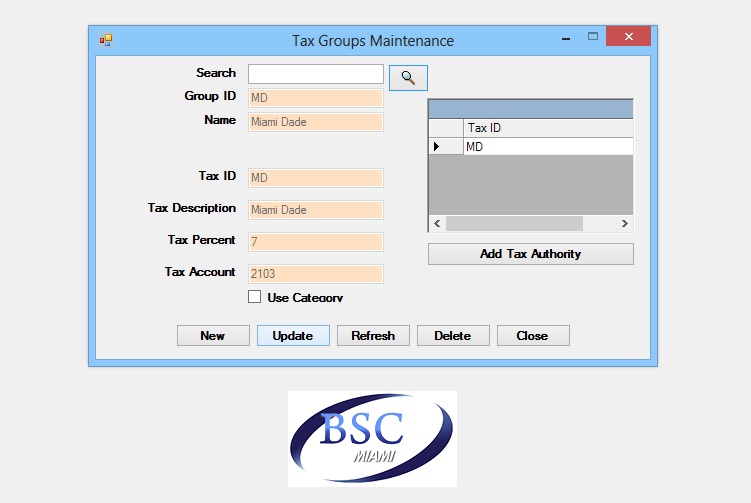
Setup Tax Groups
1. Go to the main menu click on Setup/Tax/Tax Group
2. Press "New" to add a new Tax Group to the database.
3. Enter a Tax Group ID
4. Enter a description
5. Press "Update" to save your changes
6. Press the "Add Tax Authority" button. This will open a lookup of all Tax authorities in the system
7. Select the Tax Authority that you want to add to the Tax Group and Press the "Select" button.
8. Close the "Tax Authorities" lookup form
9. Press the "Update" button to save your the new additions.
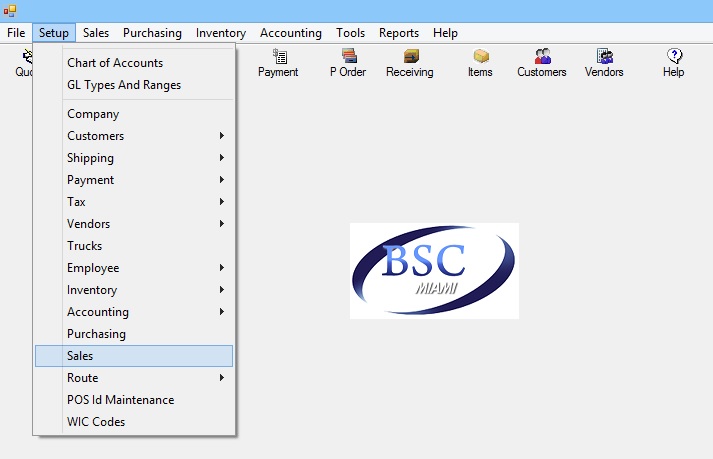
Setup Sales Preferences
1. Go to the main menu click on Setup/Sales
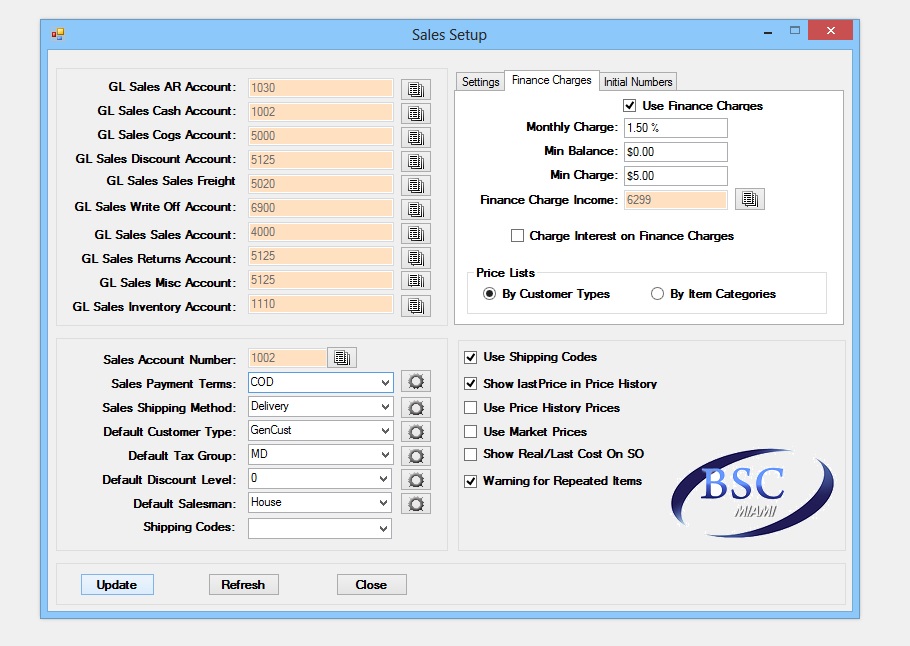
2. Select the "Sales AR Account" by clicking the search button to the right of it.
3. Select the "Sales Cash Account" by clicking the search button to the right of it.
4. Select the "Cost of Sales" Accounts by clicking the search button to the right of it. The actual cost of the sale goes into this account. This is the amount of cost associated with the sale that takes place. It is calculated by Average cost. This account is used only if the corresponding account on the Item is blank.
5. Select the "Sales Discount Account" by clicking the search button to the right of it. Whenever you discount a customer's invoice or the discount amounts from payment terms post to this account. This account cannot be overridden by item Setup.
6. Select the "Freight Income " Freight" account by clicking the search button to the right of it. Shipping charges will post to this account. This account cannot be overridden by item Setup.
7. Select the "Sales Write-Off Account" by clicking the search button to the right of it.
8. Select the "Sales" Accounts by clicking the search button to the right of it. This is the default revenue account used for invoices and sales memos, if not overridden at the Item level. This account is used only if the corresponding account on the Item is blank.
9. Select the "Sales Returns" Account by clicking the search button to the right of it. When customers return items, the negative revenue goes into this account, while the regained cost of the inventory item goes into the Inventory account. This account cannot be overridden by item Setup.
10. Select the "Sales Miscellaneous Account" by clicking the search button to the right of it.
11. Select the "Inventory" Account by clicking the search button to the right of it. When you sell an item, its cost is subtracted from this account, since you no longer have the item. This is the default inventory account that is used when there is no inventory account on the item.
12. Check the "Use Finance Charges" - If you want your customers to be billed finance charges for late payments. Then, at the end of every month you will assess finance charges using the Month End Closing Assistant. If you decide to use finance charges, you must also set up the rest of the information, described below
13. Enter Monthly Finance Charge - This is the percentage amount charged to your customers every month if they have over the Minimum Balance. It is calculated by dividing the Annual Finance Charge by 12 (months are used, not periods, in calculating finance charges)
14. Enter the Minimum Balance. If customers owe more than this Minimum Balance at the end of the month, they will be charged the Monthly Finance Charge.
15. Enter the Minimum Finance Charge. Customers are charged based on a percentage of the amount they owe. Regardless of how much this amount is, if they owe more than the Minimum Balance they will be charged at least this Minimum Finance Charge.
16. Check the "Charge Interest on Finance Charges " if customers do not pay the finance charges. You can calculate additional finance charges the next month based not only on the amount they owe on their purchases, but also on the amount they owe in finance charges
17. Select the "Finance Charge Income" account by clicking the search button to the right of it. When Finance Charges accrue they post to this General Ledger account.
18. Select the "Sales Number Account" by clicking the search button to the right of it. This account will be used as the default sales Account when any new customer is added to the system.
19. Select the Payment Terms, Shipping Method, Customer Type, Tax Group, Discount Level, and from the different dropdown boxes. That information is used when a new customer is created as the defaults.
20. You can set up four distinct periods. Usually these are from 0 to 30 days, 31 to 60 days, 61 to 90 days, and over 91 days. Invoices you have sent will each fall into one of the periods. This allows tracking of your receivables.
21. Select the right option in the "Age Invoices by" to choose to age your invoices either by the date the invoices were posted or by the date on which they are due. The due date is calculated from the payment terms. The invoice date is the date the invoice was posted
22. Select the right option in the "Account Default." This option chooses whether the item card or customer card will be used for the primary account defaults. If there is no information on either the customer or item Setup regarding the Sales account, then BSC Software will use the Sales account you defined on the left side of the form. If, on the other hand, there is information on both the customer and item Setup, then you must tell BSC Software which one to use. Do this by selecting either the Customer or Item option
Setup Customers
1. Go to the main menu click on Setup/Customers/Customer Maintenance
2. Press the "New" button
3. Enter the Customer Id and Description. The customer ID can be alphanumerical but it must be unique. Try to enter a meaningful description not exceeding 30-50 characters.
4. Enter the Customer Billing Information (name, city, state, address, etc).
5. Enter the Customer's "Tax Id" number. This is for customers who are exempt from taxes.
6. Enter the Customer's "Credit Limit." For unlimited credit, enter 0 in this field. For no credit, enter a small number like $0.01
7. Select the default "Payment Term" for this customer
8. Select the "Customer Type" for this customer. This action will assign the prices on that Customer Type/ Price List to this customer.
9. Select the default "Tax Group" for this customer
10. Press the button to the right of the "GL Sales Account" textbox. Select an account that will reflect sales to this customer. This account comes by default from the Company Sales Setup when a new Customer is created.
11. Select a "Salesperson" from the list. You can only select employees who are marked as salespeople
12. Enter the default "Discount %" for this customer. This figure will be automatically inserted in all Sales Orders/Invoices. Leave it as Zero for no discount
13. If you want to sell all items to a customer at a fixed percentage margin over Real Cost enter a value greater than Zero in the "Cost Markup %" textbox
14. If you want the customer to receive printed Statements, then check the Statements option.
15. If you want the customer to be charged for past due invoices, then check the Finance Charges option
16. Select the default "Shipping Method" for this customer
17. Select the default Discount Level for this customer
18. Select the default Truck that will cover the route for this customer if that information is available. Leave it blank otherwise.
19. Enter the customer's Bank Name if available.
20. Click the "Consolidate" checkbox if this customer will be the consolidated contact for all customers in that customer group. The system will not let you have more that one "consolidate" customer within a price list. You can print a consolidated statement for the entire customer Group when you select this customer(See Statement Printing)
21. In order to setup this customer route there are some fields that should be filled. First of all, you need to enter the Route Code. Furthermore, The route order field has to be filled to reflect what order of delivery has this customer in the selected route. Furthermore, if the customer has a fixed route, you need to select what days of the Week (M-F) and what weeks of the month (1-5) they have to be visited as part of the delivery route. This information will be vital when designing the daily trip.
22. Press the "Update" button to save your information.

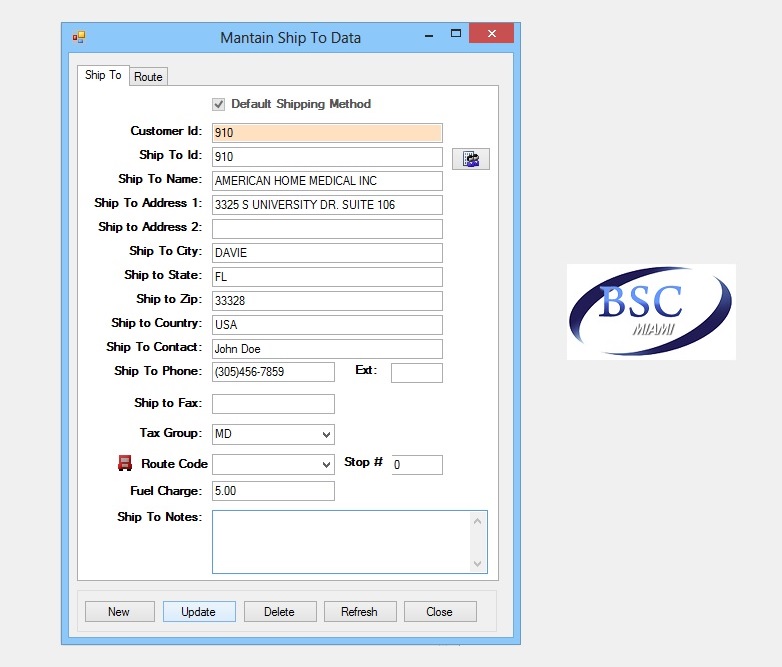
23. When a new customer is created a new Ship-To Address will be created according to the customer information. You can press the "Ship-To" button to edit the default address or add more.
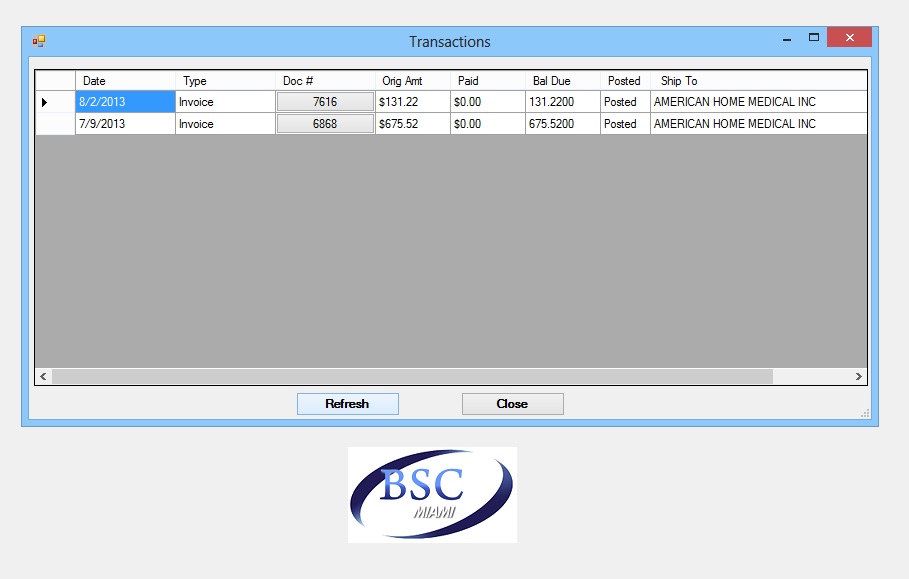
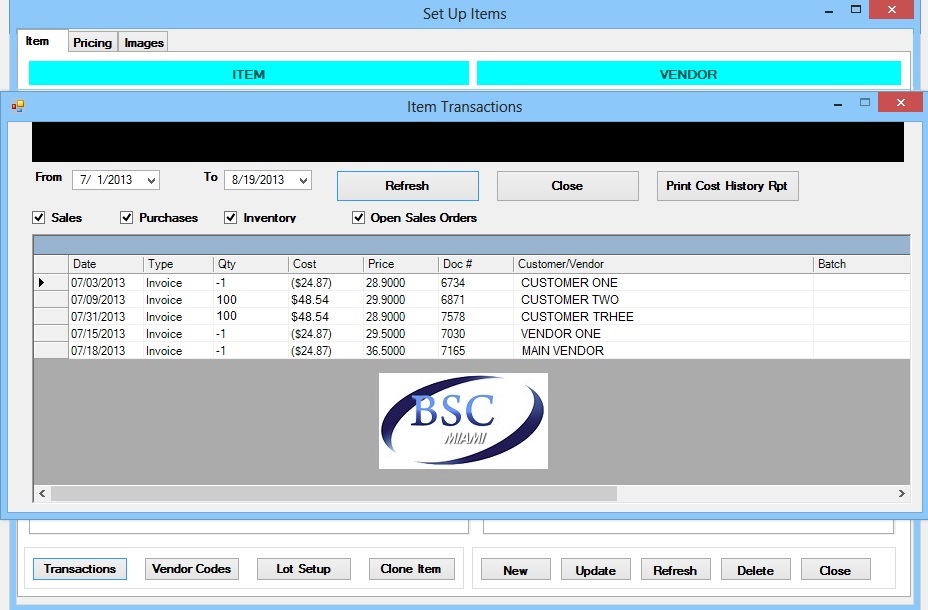
24. Press the "Transactions" button to see a lookup of all transactions related to this customer in the "Days Back" Period of the company (See Company Setup). Those transactions are ordered by Date and the list is updated real time as the transactions get posted.
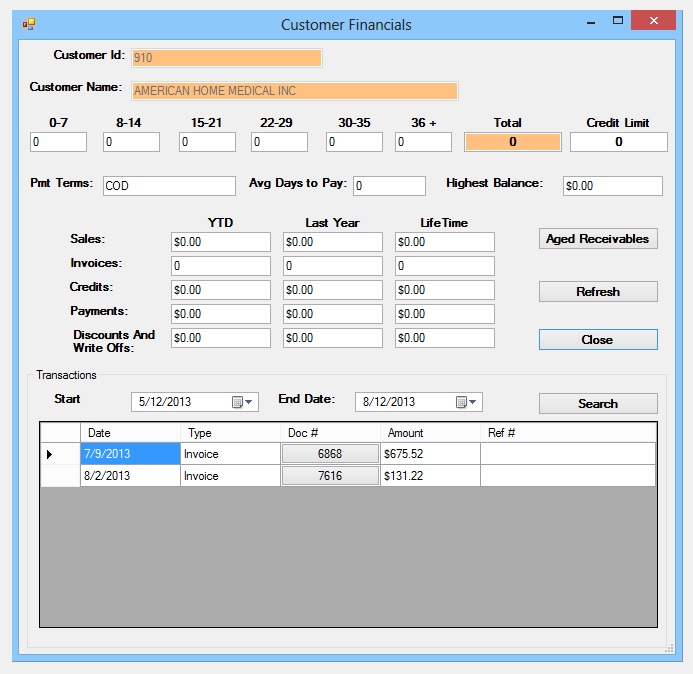
25. Press the "Financials" to see the financial status of this customer. This feature will contain meaningful data after some transactions are posted
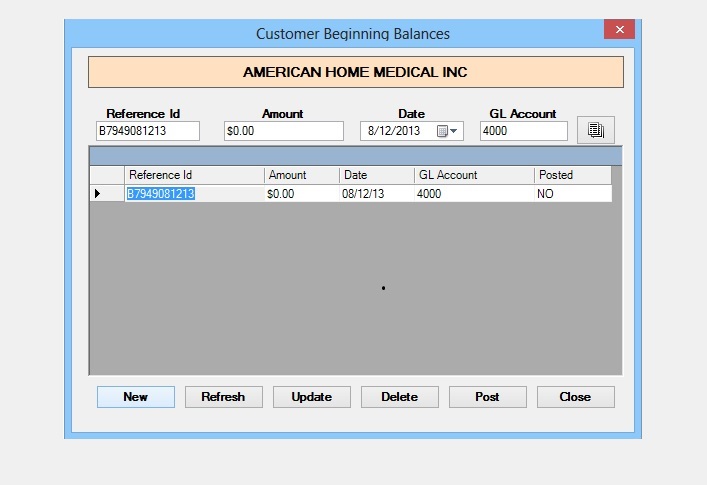
26. Press the "Beg Invoices" button to enter any prior Charges to this customer.
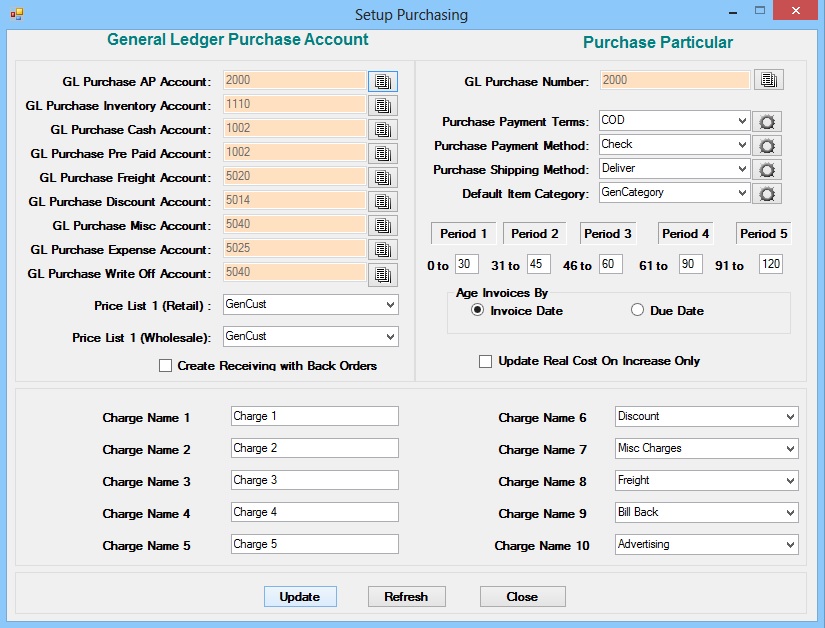
Setup Purchasing Preferences
1. Go to the main menu click on Setup/Purchasing/
2. Select the "AP Account" by clicking the search button to the right of it. All Accounts Payable transactions post to this account. The AP Account cannot be overridden by the item or vendor Setups.
3. Select the "Inventory account" by clicking the search button to the right of it.
4. Select the "Cash Account" by clicking the search button to the right of it.
5. Select the "Prepaid Account" by clicking the search button to the right of it.
6. Select the "Freight Account" by clicking the search button to the right of it. Cost of Shipping transactions post to this account. The Freight Expenses Account cannot be overridden by the item or vendor Setups.
7. Select the "Discount Account" by clicking the search button to the right of it. Any discounts from your vendor that you decided to take advantage of post to this account. The Discount Account cannot be overridden by the item or vendor Setups.
8. Select the "Miscellaneous Charges Account" by clicking the search button to the right of it. Any other charges not classified as falling into one of the other accounts post to this one. The Miscellaneous Charges Account cannot be overridden at the item or vendor level.
9. Select the "Write Off Account" by clicking the search button to the right of it.
10. Select two different Customer/Price Groups from the dropdown lists. On the "First" and "Second Price Group to Show in PO" dropdown list.
11. Check the "Create Receiving with Backorders" if you want to create a receiving record for the backorder Items of a receiving.
12. You can allocate a total of 10 different charges for an Item in the receiving when you are calculating the Real Cost. The first five charges are entered manually. You should give them a short and meaningful description.
13. The last five charges allow you to enter any description or select a receiving related charge like: Miscellaneous Charges, Freight or a Receiving Credit like Bill Back Advertising and Discount.
14. Select the "Purchase Number Account" by clicking the search button to the right of it. This account will be used as the default Accounts Payable Account when any new vendor is added to the system.
15. Select the Payment Terms, Payment Method, Shipping Method, and Item Category from the different dropdown boxes. That information is used when a new vendor or Item is created.
16. Having accounts payable aging periods allows Apt For Access to track the age of past invoices. You can set up four distinct periods. Usually these are from 0 to 30 days, 31 to 60 days, 61 to 90 days, and over 91 days. Invoices or bills you have received will each fall into one of the periods. This way, you can decide to only pay bills after 60 days, or when they are in the first aging period, or whenever you like. You can age your invoices either by the invoice date, or by the date on which they are due.
17. BSC Software can age invoices either by the Invoice Date or by the Due Date. The due date is calculated from the terms of sale. The invoice date is the date the purchase order/receiving was posted
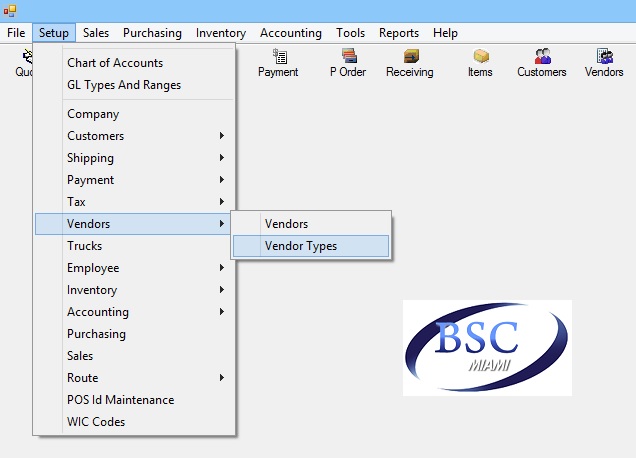
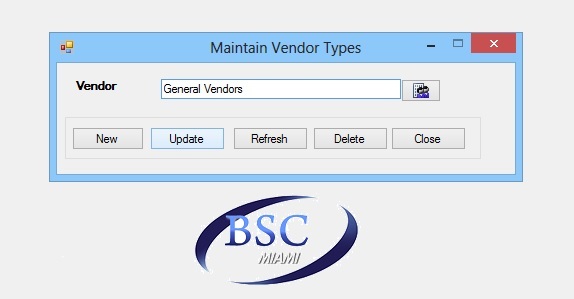
Setup Vendor Types
1. Go to the main menu click on "Setup/Vendors/Vendor Types
2. Press New
3. Enter the Vendor Type Description. This must be a unique and meaningful alphanumeric Description not exceeding 50 characters
4. Press the "Update" button
Setup Vendor Types
1. Go to the main menu click on "Setup/Vendors/Vendors"
2. Press the "New" button to add a new Vendor
3. Enter the Vendor Id. This must be a meaningful Unique identifier
4. Enter the Vendor Description. This should not exceed 50 characters.
5. Address, Phone and contact information are optional, but you should enter as much as possible as it is used in the statements and other AP reports.
6. Press the "Lighting Bolt" button to the Right of the Vendor's Bank Text Box to Copy the Bill to Information into the Remit To Fields in the right of the form
7. Enter the Vendor Remit To information located on the right side of the vendor setup form. All of the Address, Phone, Contact, and Bank information has to be filled if you are planning to send PO's to this vendor.
8. Enter the website address of your vendor in the "Internet Address" if you use the web to place orders to this vendor or this information is available.
9. Select the appropriate vendor type from the dropdown list. The information here comes directly from the Vendor Types Setup table.
10. Select using the button the appropriate AP account for this vendor.
11. Select the appropriate vendor Terms from the dropdown list. These terms will be assigned by default to any new PO that is placed to this vendor. However the user will always have the chance of changing that if needed.
12. Select the appropriate shipping method from the dropdown list. This shipping method will be assigned by default to any new PO placed to this vendor. However the user will always have the chance of changing that if needed.
13. Enter the Tax Id Information for this vendor. The Tax Id Information is required by many state governments in order to sell taxable items to other resellers. It is very important to enter the right information in here and check with your customers at least once a year for the validity of this number.
14. Enter your Customer Id number for this Vendor in the "Customer Id" field. This is an optional field designed to enter the customer Id that your vendor assigned you. This information can then be included in the purchase order so that your vendor recognizes you faster when they receive an order.
15. Press the "Update" button to save your changes
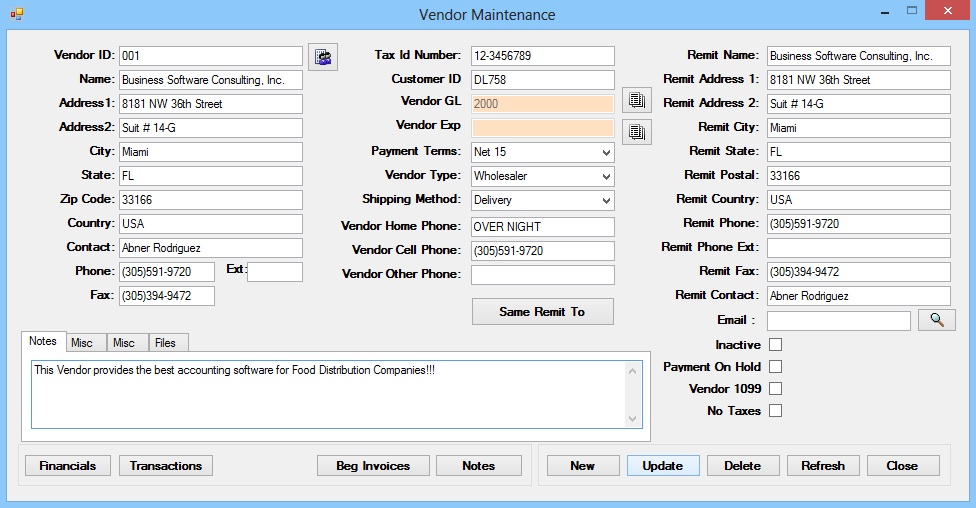
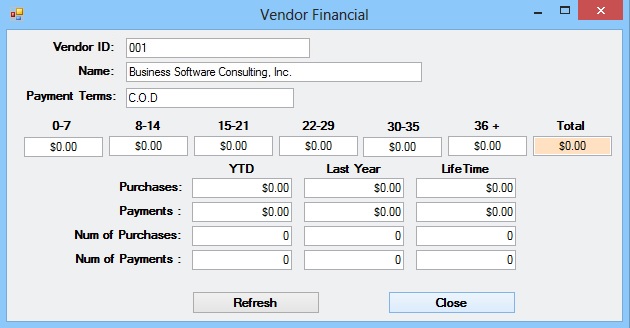
16. Press the vendor financials button located at the button of the form to see all the AP information related to this vendor. The Vendor Financials Form will show you the AP Balances by periods, and the default terms with this vendor. In addition to this you can see the purchases and payments amounts and count Year to Date, Last Year and Lifetime. The information in this form is updated real time and it will reflect all posted Transactions.
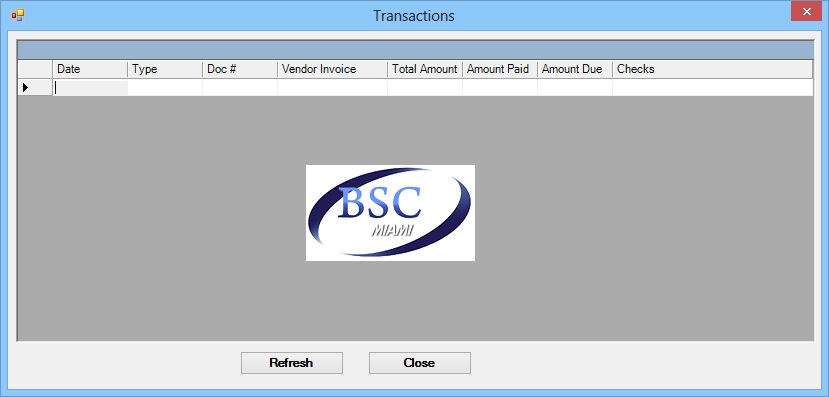
17. Press the vendor transactions button located at the button of the form to see a summary of transactions for this vendor. The grid will bring by default the number of days back that was setup (see Setup Company). This lookup will show a summary of all PO, Receiving, Payments, Vouchers and Credit Memos, Beg Invoices and Payments for his vendor.
18. Press the Beg Invoices button located at the button of the form to enter a Beg Invoice for this vendor. This form allows you to increase the amount owed to this vendor without doing a PO or a voucher. This function is mostly used when the user starts with the system having a number of AP transactions on the old system. This utility allows the user to enter all of those charges without entering the whole PO again. Then when the payment is received it can be applied to one of these Beg Invoices

Setup Inventory Items
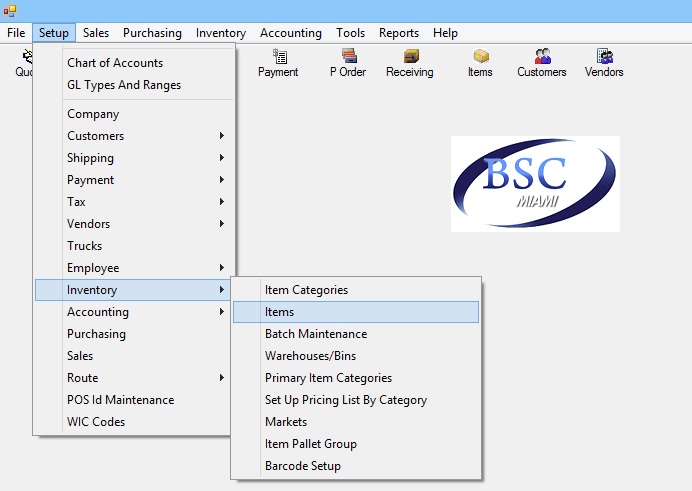
1. Go to the main menu click on Setup/Inventory/Items
1. Press the "New" button
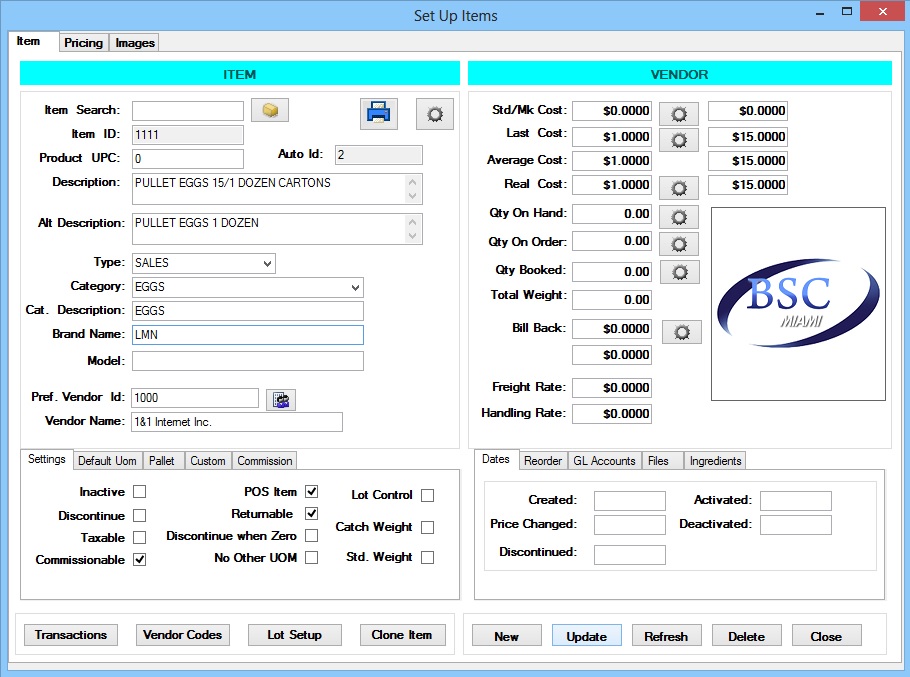
2. Enter the Item Id. Item ID's can consist of letters and Numbers if the company is setup for that (See company setup). Once this Item is saved this number cannot be changed. You can enter in here your own internal code and leave the �Product UPC� field for the Long Number that appears in the product�s barcode.
3. Enter the Product UPC. This is an optional field. However, You can enter in here a secondary UPC for this product. Contrary to the Item Id this Product UPC can be changed at any time to reflect changes in the product labeling.
4. Description. Enter a meaningful description of the item and its significant characteristics. The description is limited to 255 characters. However you should keep it around 25-30 characters to avoid having two lines per Item in Invoice and other reports.
5. Select the Item Type from the List. Sales this is the most common item type. It represents a typical item that can be purchased, that has quantities, and that can be adjusted and sold. Once an item has been saved, its Item Type cannot be changed.
6. Select from the dropdown list the category where this product fits. If you don't see an appropriate category you can add it to the system first (See Setup Item Category). Once you select the desired category the Category Id is inserted in the Combo Box and the Text button below is filled with its description. It is very important to analyze what categories you are assigning the items into as this will be reflected in the price list, sales analysis report and Items that share a common category grouped together in the picking ticket.
7. Enter the commission percentage that you want to assign to this Item when the Salesperson Commission Report By Salesperson is printed. The system will insert a default commission percentage of 1 %. The information in this field is optional if you only print the commission report based in the commission percentage that was assigned to your salespersons (See Employee Setup)
8. Check the inactive checkbox if you want to make the Item Inactive. This will take the item from all price lists and all searches. The only place where you can have access to this item is through the Item Setup Form. Usually, you should make an item inactive when you plan not to sell it for a short period of time. This will effectively take it out of your system and nobody will be able to sell it or buy it anymore until you uncheck this option.
9. Check the "Discontinued" checkbox if you want to discontinue this item. This will take the item from all price lists and all searches. The only place where you can have access to this item is through the Item Setup Form. Usually, you should make an item inactive when you don�t plan not to sell the item in the foreseeable future. This is usually the case when your vendor tells you that this item is not available for sell anymore or it was replaced by a another product. This will effectively take it out of your system and nobody will be able to sell it or buy it anymore until you uncheck this option.
10. Check the Taxable checkbox if this item might be subject to any of the Tax Groups that your customer is part of (See customer setup). However, if the company was setup as a non taxable company, this checkbox will have no effect in the charging or not of taxes to your customers (See Company Setup)
11. Check Commissionable Checkbox if this Item will be taken into consideration when calculating the Salesperson Commission Report.
12. This form has 8 Text Boxes containing information about the Default Unit of Measure. Those textboxes are: Unit, Qty, Amount, Selling Price, Net Weight, Type, Weight, Cubic, and Surcharge. These fields are disabled and reflect the default Unit of Measure for this Item. That Information is Maintained in the Setup Item Pricing/UOM form which can be accessed pressing the Pricing Tab at the top of the form.(See Setup Items UOM)
13. Enter the layers per pallet and the cases per layer for this Item. The system will multiply the two and fill the Cases per Pallet textbox. This information is usually helpful at the Purchase Order when buyers usually need to know how many cases they need to buy to buy a whole pallet of merchandise and get price discounts. This information also helps to determine how many cases the customer needs to buy to get the Price B or Pallet Price for an Item (See Setup Items UOM, Setup Item Group Pricing)
14. Enter the Standard Cost for this Item. This cost doesn't change because of any transactions and it only gets reflected in the purchase order/Receiving as a reference. This form shows the Cost by the smallest and Default Unit of measure side by side.
15. Enter the Last Cost for this Item. This cost changes whenever a new receiving or inventory adjustment is posted. This cost is used as the base of any Purchase Orders and Receiving and it reflects real time transactions. This form shows the Cost by the smallest and Default Unit of measure side by side.
16. The Average Cost starts as zero when an Item is added. However, it does change whenever a new receiving or inventory adjustment is posted. This cost is used as the base of any Purchase Orders and Receiving and it reflects real time transactions. You cannot change the content of this field directly in this form.
17. Enter the Real Cost. This cost does change whenever a new receiving is posted. This cost is used as the base of any �Cost Markup� Price lists. If you are not allocating for extra charges (Freight, Duties, Import Fees, etc) when you post a receiving or voucher, this cost will stay equal to the last cost. However, if you allocate charges or Credits in the Receiving or Voucher this cost can be higher or lower than the last cost. This form shows the Cost by the smallest and Default Unit of measure side by side.
18. The "Qty On Hand" for the product will show as Zero. This figure will reflect any merchandise that is currently sitting in your warehouse no matter if it is waiting to the shipped
19. The "Qty-On-Order", for the product will show as Zero. This textbox will show how much of this merchandise is on order (In Purchase Orders that you have not received).
20. The Qty Booked for the product will show as Zero. This textbox will show how much of this merchandise is Booked (On Sales Orders that you have not shipped).
21. The "Total Weight" for the product will show as Zero. If this is a catch weight Item this figure will reflect the total weight of the On Hand Qty. This figure is updated on any transaction concerning this Item
22. Press the button to open up a Vendor Search Screen. Select the desired preferred vendor from the list and its Id, Name and URL information will be entered in the Item Form. You should select the primary vendor from whom this item is most often purchased.
23. Click on the Vendor Pricing Group to select an existing Vendor pricing Group according to the preferred vendor you already selected (See Setup Vendor pricing Group)
24. Enter the Reorder Point. This will reflect the minimum amount of Inventory on hand the system will have before triggering a reorder of merchandise.
25. Enter the Reorder Qty. This will reflect the minimum Qty to be reordered when the Qty on hand reaches the Reorder Point.
26. Select one of the two options (Pickup or delivery) of the "Pickup" Dropdown. This is an optional field.
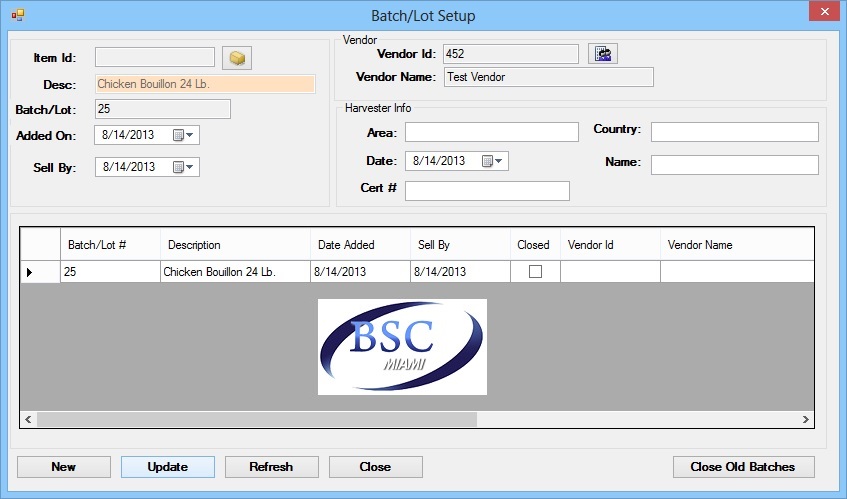
27. Check the "Batch Control" option to make this item a "Batch Controlled" one. This will affect all of its transactions, as it will require you to enter a Batch Number and Expiration date. In order to setup some batches without transactions you need to click on the Batch Setup button (See Batch Maintenance)
28. Check the "Catch Weight" option to make this item a "Catch Weight" one. This will affect all of its transactions, as it will require you to enter the individual weight for all the units of this item that you buy or sale. Therefore, the cost information for these items is reflected by the pound and not by the qty.
29. Click the "Vendor Codes" button to setup an unlimited number of vendor codes for this item. Those vendor codes will show when we print a Purchase Order to the specific vendors. In addition to that, there is a report called Inventory Vendor codes that can be printed to reflect these changes. (See Setup vendor Codes.)
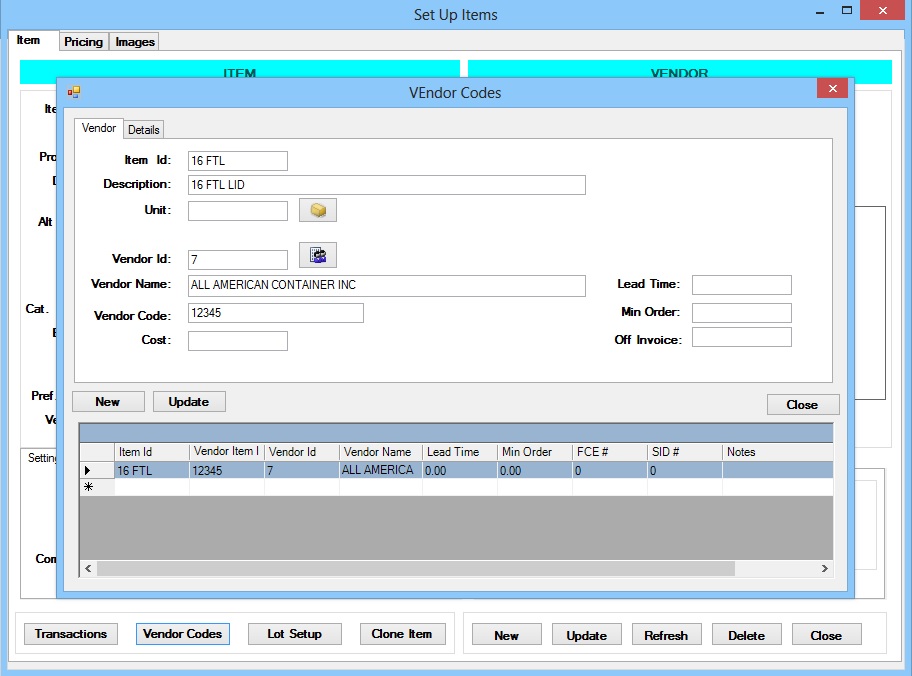
30. The Created, Activated, Discontinued, Deactivated, and price changed dates, are modified every time this form is updated. They will serve as the most important aspect when management needs to print reports based in this data that will allow to print price lists based in this criteria.
31. Press the "Update" button, this will create a new Item In the database.
32. Press the "Transactions" button. This see the transactions where this item has participated based in the time period selected In the company Setup. Those transactions can be filter out by Sales, Purchases, Inventory Transactions or a combination of the three.
33. Press the Clone Item button to create an exact copy of this item. The system will prompt you to enter a new Item Id/UPC Number. When the item is cloned you will be taken to that item's information so that you can change some of the elements like description, cost or Price. Qty on Hand, Qty on Order Booked and average cost figures are cloned as Zero.
34. Click the "Pricing" tab to set the different UOM's and pricing structures of this item. In addition to this, You can also assign Price Lists (See Setup Items UOM, Item Group Pricing
Setup Item's Unit of Measure and Pricing
1. Go to the main menu click on "Setup/Inventory/Items."
2. Add a New Item or Select one from the List
3. Press the Pricing Tab
4. The Item Id and Description fields are disabled. They come from the Initial Inventory Setup form. You have it here just as a reference.
5. Press the "New" button to add a new Unit of Measure to this Item. You will see a window prompting you to enter the name of the new Unit. This is an alphanumerical field. Therefore, provide a meaningful and short description of the Unit of measure of this Item. For example some popular choices include: Case, Half Case, Each, Pallet, Dozen, Box, Lb, etc. Try to be Uniform through the system not having too many UOM classifications. You cannot have the same exact Unit description more than once for the same Item.
6. Enter the Qty per Unit of measure of this Item UOM based in the smallest Unit of Measure that you buy or sell. For Example lets assume you sell Item A in cases, Half Cases and Units and the case has 24 Units Inside. Therefore the Case Qty will be 24; half case will be 12 and Unit 1. In the given case that you have a product that you buy and sell by the case and you do not accept returns in any smaller UOM, you can enter 1
7. Enter the Net Weight of this Item in the first textbox. This is numerical field, so feel free to enter any number with its decimals. In the field to its right enter the measurement type for this Net Weight (Oz, Lb, Kg, g) etc. The information in here will be reflected in the price lists.
8. Enter in here the average weight for this item. This information is optional for non Catch Weight Items. However, you should maintain this field with the most appropriate information for Catch Weight Items. This is due to the fact that when you are selling this items, prior to the picking of the products the price for these items will be calculated by using the average Weight and the per pound price. After you have shipped invoice the merchandise the system will use the sum of all the individual weight of all the items involved.
9. Enter the Min/Max Weight if this is a catch weight Item. Try to enter figures that allow some room for growth. If you are not sure about the appropriate value of this field you can leave it blank and the system will not check for this information when doing the weight distribution.
10. Enter the Cubic factor for this Item's UOM. This is an optional field. However, this factor is often required by shipping companies in order to calculate their freight rates. The total cubic can be seen in Sales Order, Shipping and Invoice.
11. Select a Pallet group from the list. This action will allow this item to assign price B not only when the Price B Qty is achieve, but also when the combination of quantities from all the members of this Pallet Group reach the Pallet Group Qty. (See Setup Pallet Group)
12. Check the default value to make this the default Unit of Measure default. The system wont allow you to have more than one default Unit per Item.
13. The Amount Unit is usually calculated for you right after you enter a "Selling Price" and tab away from it. The number in here is usually the result of dividing the Selling Price by the Qty
14. Enter in the Surcharge field any additional charge that you want to add to the final Selling Price. This is usually used when selling Units of measures that require breaking the Case. For Example many companies opt to charge an additional 50 Cents per unit price when they break the case and sell Units or Half Cases
15. Enter the Regular Selling Price of this Unit of measure. This figure will be assigned to any customers who doesn't have this combination of Item/UOM in his price group. When you enter the right figure in here the system will recalculate the "Amount Unit" figure and the figures of the other UOMs if you press the button to the right of it.
16. Enter in the "Price B" field the Price this customer will get if he/she buys more than the Price B Qty
17. Enter the Price B Qty according to the Unit of measure you are working with.
18. Check the "Price B Special" If the special that you will enter underneath will only apply for customers that buy a quantity greater or equal than Qty B. Otherwise just leave this unchecked and the special will apply to Quantities <= Qty B
19. Enter in here the special selling price of this Unit of Measure. The system will always assign the best available price to customers. Therefore, this figure is always compared to the Customer Price List and Contract pricing to assign the better of the three to customers in Sales Orders and Invoices.
20. Select a customer type from the list. If you leave this blank, the special pricing will apply to all customer groups. If you select a specific customer group, the special pricing will only apply to them.
21. All the Specials are date driven. Therefore, it is very important to enter the right info in the From/TO fields. The system will only consider specials if the current date falls within this period.
22. Check the "Apply to Salespersons" if you want to make this special available not only to the Cash and Carry Customer but to distribution Customers as well.
23. Press the "Update" button to save your info
24. Press the "Group Pricing button to see the price Groups where this combination of Item/UOM is present. (See Setup Item Group Pricing)

Copyright © 2018 Business Software Consulting , Inc. All Rights Reserved.