Sales Tutorial
This tutorial will guide you through the process of preparing a Sales Order, Ship the Sales Order, log the Sales Order, Ship the Sales Order, Edit and post the Invoice. You should be able to follow the step by step instructions to do all of those tasks. If you need additional information about some of the Items in there, just refer to the help topics.
Prepare New Sales Order
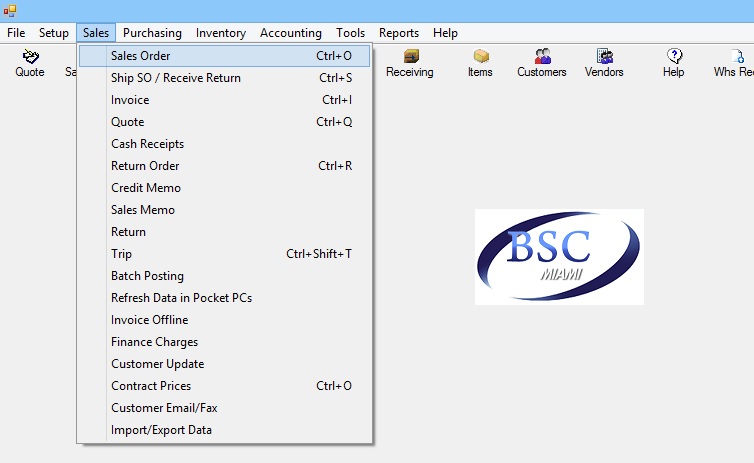
1. Go to the main menu and Click on Sales/Sales Order. You can also use the "Sales Order" button in the toolbar
2. Press the New Button in the Lower left hand side of the screen. This will clear all contents from the form and position the cursor over the customer search button. If you have an unsaved sales order when you click new, the system will prompt you to save the data before continue
3. The Warehouse field is filled with the company's default warehouse. If you want to ship your order from a different location, select the desired warehouse from the dropdown list
4. The "Order Date" and "Approximate Ship Date" will show today's date by default. However, you can change that information by clicking in the date/time picker selection button
5. Search for a customer either by pressing the Yellow Folder Button or entering the customer Id in the text box and pressing enter.
6. When you bring the customer information to the screen all the Bill To/Ship to fields are filled with the customer information
7. You can press the Search Button to the right of the Ship To Fields to select and alternative ship to for this customer if available
8. If you want to edit the customer information or you need to add a new customer to the company, click the "Red Notebook" button to open thee customer setup form (See Customer Setup)
9. The Payment Terms, Ship Via, Salesperson and Tax information comes from the selected customer's information. You can change these fields by selecting alternative options from the combo box.
10. The cost markup box will show the customer's default cost markup. Entering any value on this field greater than zero will assign any items to this Sales Order according to that margin percentage over cost
11. If this sale is attributed to any special advertising campaign that you want to track, select that value from the list (See Advertisement Setup)
12. Enter any customer reference number (if available) like their PO number in the "Reference Number" field
13. To add Items Directly to the sales order, enter the Item Id or Product UPC below the "Enter Item Id" label, press Enter and the cursor will go to the Qty Field. Enter the desired Qty in there and press enter. The Sales Order will query the database for that Item. If the Item is found, it is added to the grid below. If the Item is not found the search screen will open.
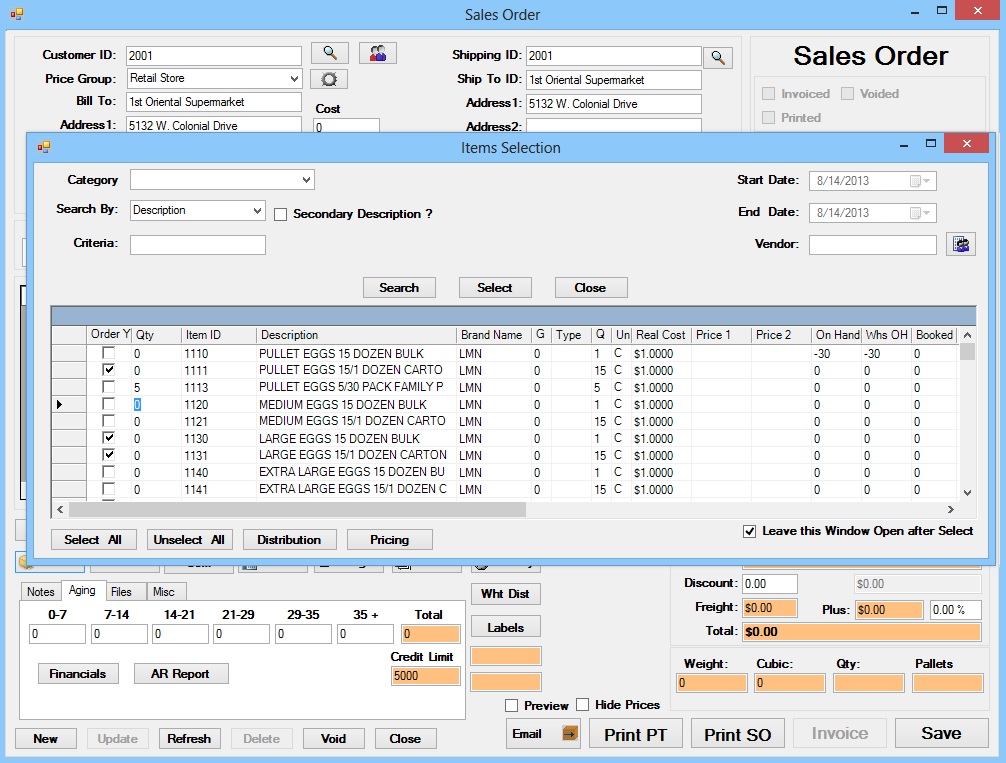
14. The search screen can be opened either by pressing the "Add Items" button on the sales order or by not finding the Item ID/UPC in the direct entry box. This form will allow you to search for an Item based on the Item's category, description, ID, UPC and Prefer Vendor. Once you find the Item or Items you are searching for you can check the ones you want to bring to the Sales Order, Press the Select Button and close the search form.
15. The items are added to the grid with the pricing information that goes according to the Cost Markup entered above or the customer's price list information. After the Item is added the user can change the Qty, Price, Discount %, Tax Percentage and weight. In addition to that, the user can also check the "To be Ordered Version" to trigger the creation of a PO for this Item. Furthermore, if the user checks the "Contract Price" option, the system will create a contract price for the combination of Item/UOM/Customer for a period of two months.( See contract Prices Setup)
16. If this Item is a Batch Controlled Item, you will be prompted to select from the list of batches for this Item and that information will show in the grid. If you decide to use a different batch just press the batch button in the desired line to open the Batch Selection screen again.
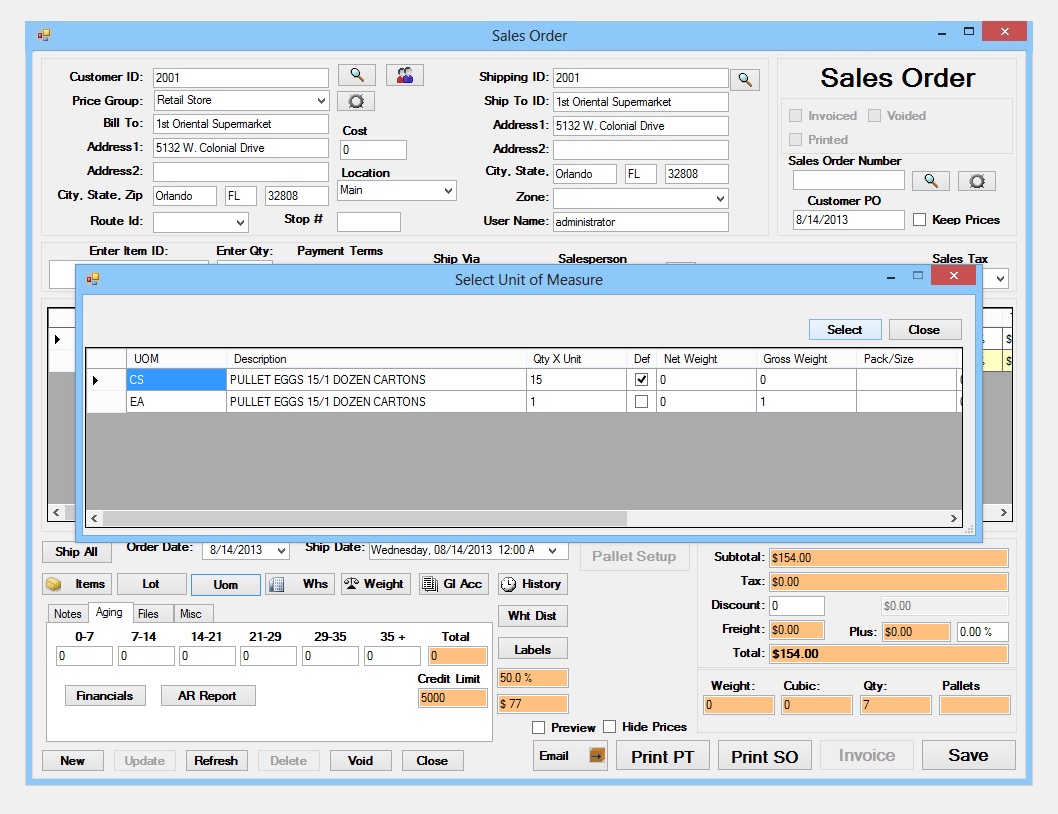
17. Click the "UOM" button to change the Unit of Measure of the selected line Item. After you select the desired UOM from the list, cost and price information for that line item will be updated accordingly.
18. When you select an Item, the Warehouse and Bin Information come based on the "Location" for the sales order and the Bins where that Item is stored in that warehouse. If the user wants to change the warehouse where the items are taken from, he/she needs to click the "WHS" button to open a list of available warehouses and Bins within those warehouses.
19. The "Weight" Button is not going to work from the sales order unless you are trying to ship some catch weight Items directly from here. If that is the case, you need to enter the "Ship" qty for the catch weight items and press the "Weight Button." This will open the Weight distribution Screen. In that screen you can enter the total weight and Save or you can add individual weights one by one.
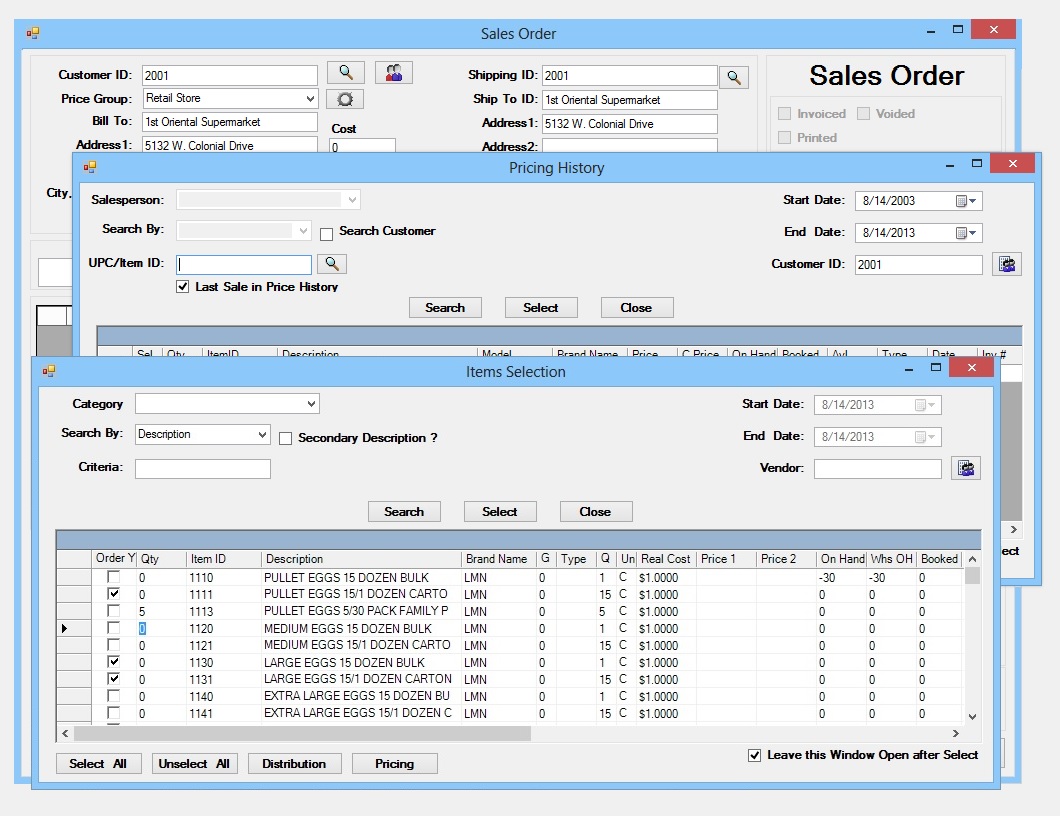
20. The History button shows you a lookup of all the items this customer purchased from you in a selected time period. The user can further that selection by filtering what items to bring based in the Date Range. Then the user can compare cost and price information from the history and if desired he/she can even bring items from that lookup to the Sales Order Item grid.
21. When the user has added all items to the Sales Order, he can add a discount % to the total. In addition to that the user can also add freight charges to this Sales Order. This can be done in the "Totals" box on the lower right portion of the form
22. When all the information is in place, Press the Save Button to complete the sales order and assign a transaction number. This action will
also increase the Booked Qty of all the Items in the Sales Order. (See Item Setup)
Shipping a Sales Order
Go to the main menu and Click on Sales/Ship Sales Order
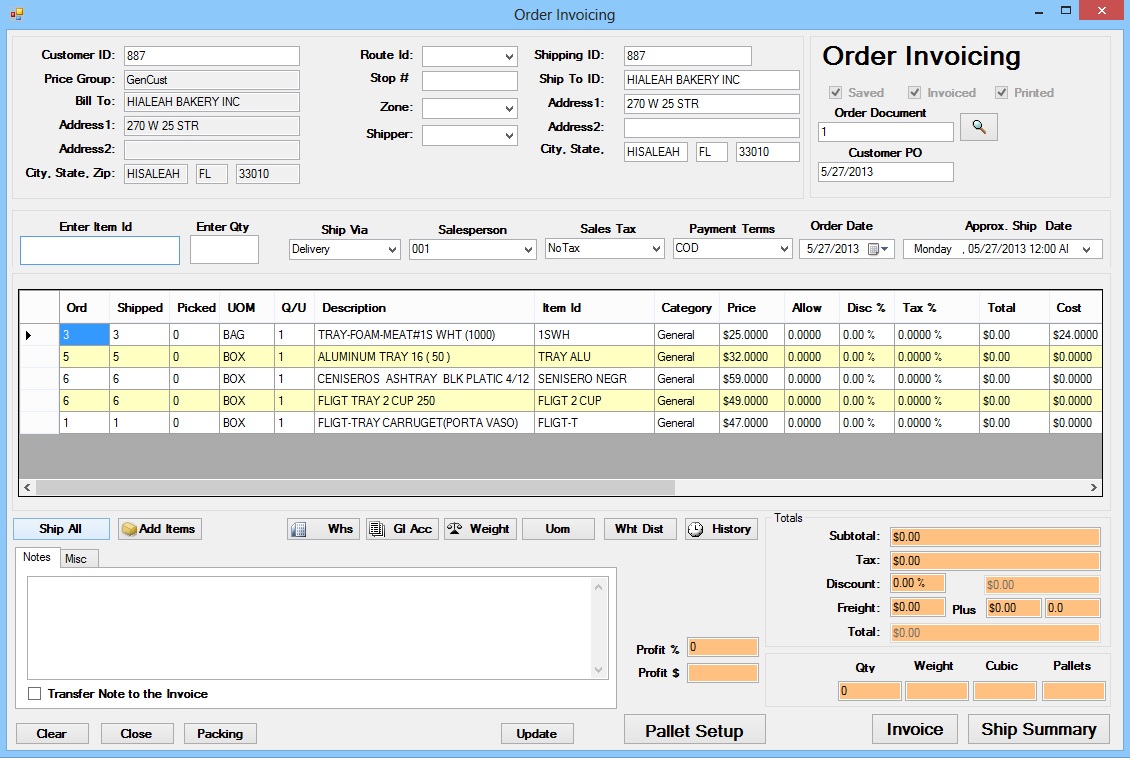
1. Search for a Sales Order. In order to ship the Sales Order and create an Invoice, the user has to bring the Sales Order to the "Ship Sales Order" Screen. First of all, if you know the Sales Order number, you can enter that number in the "Order Document" text box and press enter. This is usually the case when the user has the filled Picking Ticket in front of him. In addition to that you can press the Search button to find the intended Sales Order by Salesperson, Order Document or Customer criteria.
2. General Info. Change Ship Via, Salesperson, Sales tax, Payment Terms, Order Date and Ship Date. All of these fields come from the Sales Order. However, the user can change this information before creating the Invoice. Any changes to these fields will be reflected In the created invoice and not in the original Sales Order
3. Ship All. Click this button to ship the entire Sales Order. After you press this button the "Ship" Column will reflect the difference between the "Qty" and the "Shp" columns. Any catch weight items will get a weight distribution according to the Item's Average weight. You can always change that by stepping on the desired line and clicking on the "Weight" button.
4. Search Items within the Grid. After you have brought the Sales Order for shipping, you can search items within the Grid by entering the Item id or Product UPC in the "Search Item ID" field and pressing enter. Once the item is found, the grid pointer is based in that line and you can change the data in the "Ship", "Price", "Discount", "Tax", and "To be Ordered" columns.
5. Batch. If you have Batch Controlled Item in this Sales Order, you can click the "Batch" Button. This will prompt you to select from the list of batches for this Item and that along with the batch expiration date will show in the grid.
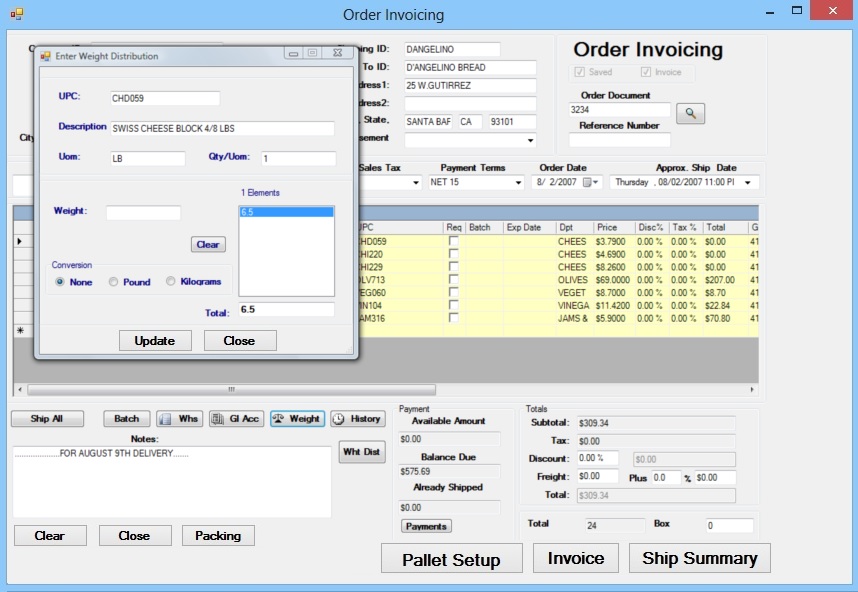
6. Weight. The "Weight" Button is not going to work unless you are trying to ship some catch weight Items directly from here. If that is the case, pressing the "Weight Button." will open the Weight distribution Screen. In that screen you can enter the total weight and Save or you can add individual weights one by one.
7. WHS. All Items come with the Warehouse and Bin Information based on the "Location" of the sales. If the user wants to change the warehouse where the items are taken from, he/she needs to click the "WHS" button to open a list of available warehouses and Bins and select the desired one.
8. Change GL Account. Click this button to change the Cost of Good Sold Account for this transaction. This will only affect the Invoice to be created.
9. Lookup Pricing History. The History button shows you a lookup of all the items this customer purchased from you in a selected time period. The user can further that selection by filtering what items to bring based in the Date Range. Then the user can compare cost and price information from the history.
10. Error Log. This button will open a form with four text boxes. They will ask you to enter the occurrences of the 4 most common picking/shipping errors. The information entered in here will update the sales order and it will show in the Picker Productivity Report.
11. Packing. Clicking this button will prompt the user to enter the case count of this order based in the different configurations the customer has set up. For example: "Repack:5 Cs: 5 Cooler:5 Tobacco:3 Total:18"
12. Payments. If you want to enter a deposit payment to a Sales Order, click the "Payments Button". After you have entered the desired payments, the amount paid and Balance Due Fields will change to reflect that. (See SO Payment)
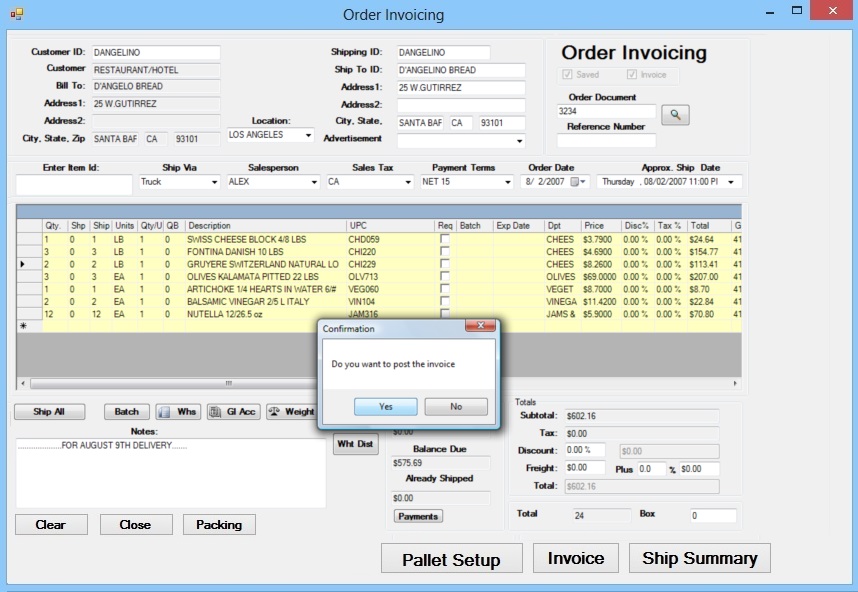
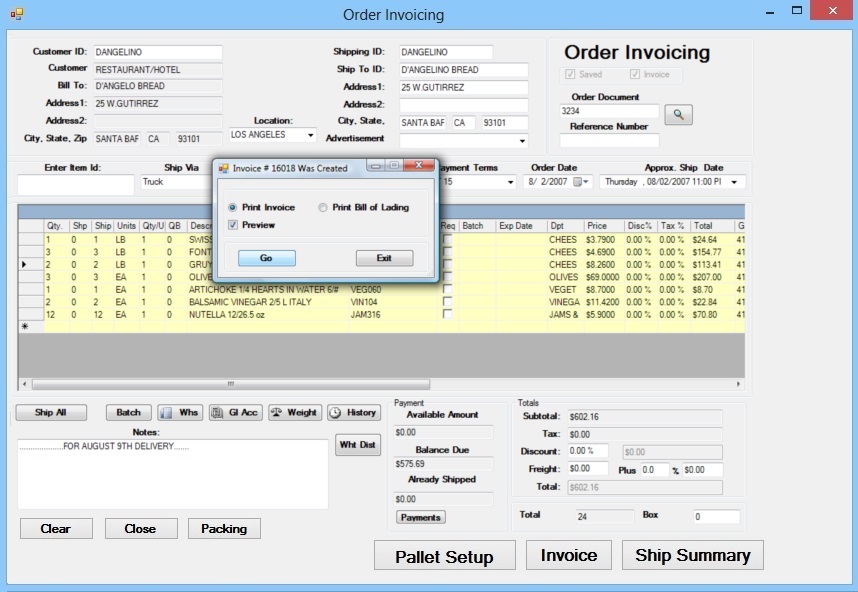
13. Invoice. hit the "Invoice" Button. This action will create and invoice and it will ask you to post it.You can choose to post or not to post the Invoice. In addition to that, the system will prompt you to print the Invoice or Packing List after that. When the invoice is created and the report printed the Ship Sales Order form is refreshed to show the "Ship" quantities as "Shipped". You cannot over ship a line item in a sales order.
14. Ship Summary. This Button will open a lookup of all the invoices that have been generated for this customer today. You can always change the selection to include a greater time frame or bring Returns instead. Then you can opt to reprint the Invoice/Packing List from that form. In addition to that, you can print the "Ship Summary" Report. This report will show a summary of the documents present in the Ship Summary Grid.
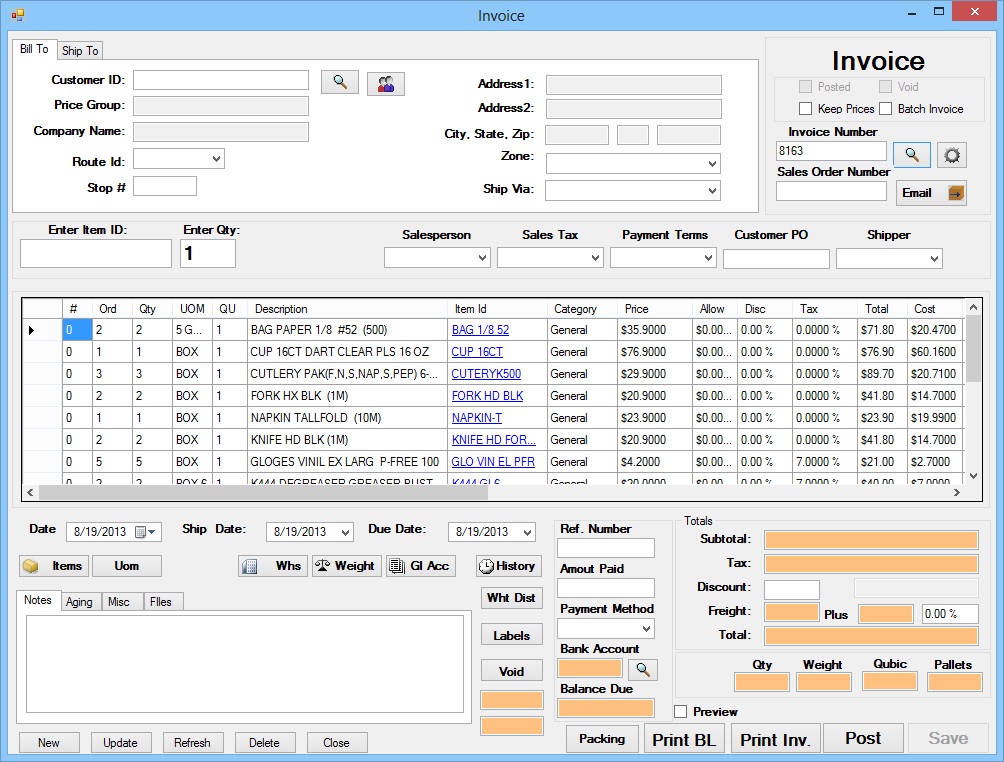
Create a New Invoice
Go to the main menu and Click on Sales/Invoice
1. Press the New Button in the Lower left hand side of the screen. This will clear all contents from the form and position the cursor over the customer search button. If you have an unsaved Invoice when you click new, the system will prompt you to save the data before continue
2. The Warehouse field is filled with the company’s default warehouse. If you want to ship your order from a different location, select the desired warehouse from the dropdown list
3. The “Order Date” and “Approximate Ship Date” will show today’s date by default. However, you can change that information by clicking in the date/time picker selection button
4. Search for a customer either by pressing the Yellow Folder Button or entering the customer Id in the text box and pressing enter.
5. When you bring the customer information to the screen all the Bill To/Ship to fields are filled with the customer information
6. You can press the Search Button to the right of the Ship To Fields to select and alternative ship to for this customer if available
7. If you want to edit the customer information or you need to add a new customer to the company, click the “Red Notebook” button to open the customer setup form (See Customer Setup)
8. The Payment Terms, Ship Via, Salesperson and Tax information comes from the selected customer’s information. You can change these fields by selecting alternative options from the combo box.
9. The cost markup box will show the customer’s default cost markup. Entering any value on this field greater than zero will assign any items to this Invoice according to that margin percentage over cost
10. If this sale is attributed to any special advertising campaign that you want to track, select that value from the list (See Advertisement Setup)
11. Enter any customer reference number (if available) like their PO number in the “Reference” field
12. To add Items Directly to the Invoice, enter the Item Id or Product UPC below the “Enter Item Id” label, press Enter and the cursor will go to the Qty Field. Enter the desired Qty in there and press enter. The Invoice will query the database for that Item. If the Item is found, it is added to the grid below. If the Item is not found the search screen will open.
13. The search screen can be opened either by pressing the “Add Items” button on the Invoice or by not finding the Item ID/UPC in the direct entry box. This form will allow you to search for an Item based on the Item’s category, description, ID, UPC and Prefer Vendor. Once you find the Item or Items you are searching for you can check the ones you want to bring to the Invoice, Press the Select Button and close the search form.
14. The items are added to the grid with the pricing information that goes according to the Cost Markup entered above or the customer’s price list information. After the Item is added the user can change the Qty, Price, Discount %, Tax Percentage and weight. In addition to that, the user can also check the “To be Ordered Version” to trigger the creation of a PO for this Item. Furthermore, if the user checks the “Contract Price” option, the system will create a contract price for the combination of Item/UOM/Customer for a period of two months.( See contract Prices Setup)
15. If this Item is a Batch Controlled Item, you will be prompted to select from the list of batches for this Item and that information will show in the grid. If you decide to use a different batch just press the batch button in the desired line to open the Batch Selection screen again.
16. Click the “UOM” button to change the Unit of Measure of the selected line Item. After you select the desired UOM from the list, cost and price information for that line item will be updated accordingly.
17. When you select an Item, the Warehouse and Bin Information come based on the “Location” for the Invoice and the Bins where that Item is stored in that warehouse. If the user wants to change the warehouse where the items are taken from, he/she needs to click the “WHS” button to open a list of available warehouses and Bins within those warehouses.
18. Press the “Weight” to open the Weight distribution Screen. In that screen you can enter the total weight and Save or you can add individual weights one by one. This will change the line item weight in the form and it will affect its line total. At the end of the line you can see a column with all the weight figures for this line Item
19. The History button shows you a lookup of all the items this customer purchased from you in a selected time period. The user can further that selection by filtering what items to bring based in the Date Range. Then the user can compare cost and price information from the history and if desired he/she can even bring items from that lookup to the Invoice Item grid.
20. When the user has added all items to the Invoice, he can add a discount % to the total. In addition to that the user can also add freight charges to this Invoice
21. When all the information is in place, Press the Save Button to complete the Invoice and assign an invoice number. This action is not going to decrease the inventory on Hand or Accounts Receivable information. That is only done when the invoice is posted.
Print Reports
1- : Press the "Print Inv" button to print the Invoice report for the company. This report will look like a tentative invoice.
2- Packing List: Press the "Print PL" button. This report will look just like the invoice, but it will not contain any prices or monetary amounts.
3- Labels. Press this button to get a Report of shipping labels for this Sales Order. The labels show Customer and Item Information
Edit Invoice
1- After you have saved an Invoice and closed the form, you can always come back and edit that information. If you know the Invoice number you can enter in the appropriate field to bring that Invoice up. In addition to that you can press the Search button to find the intended Invoice by Salesperson, Order Document or Customer.
2- After you have the Invoice in the form, you can make any changes to it and press update. The Update button will save your changes to that database and it will let you know if someone else is working on the same Invoice. If that is the case you will be prompted to refresh your data, make the changes and Update again.
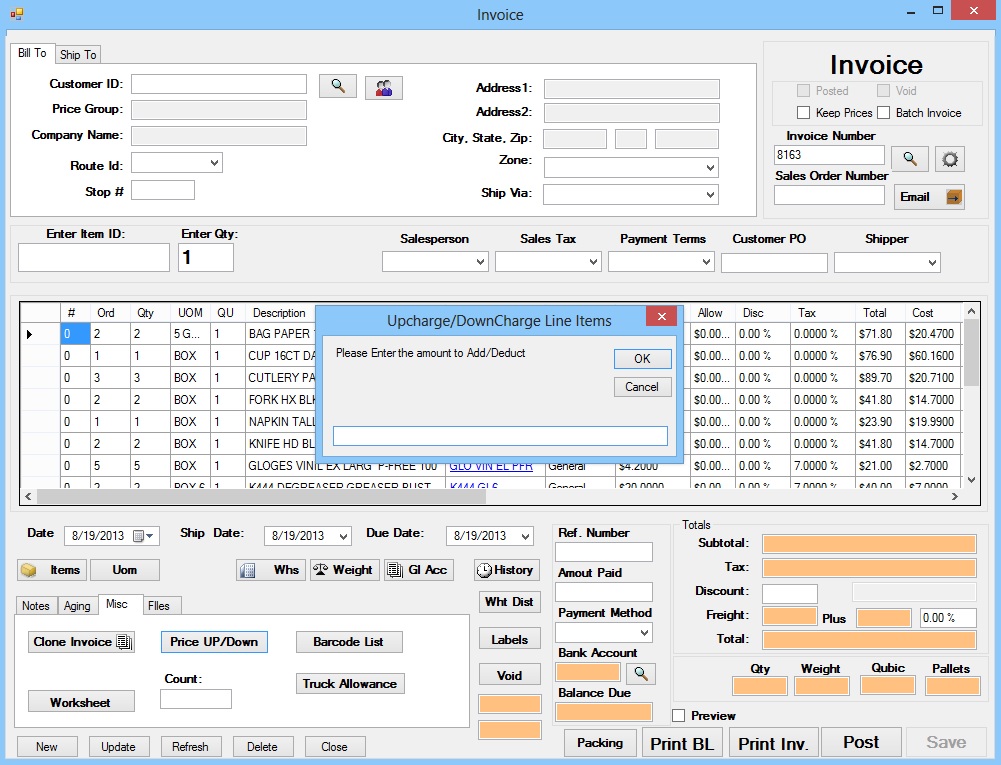
3- You can use the “Up/Down charge button to increase or decrease the Line Item price in a fixed amount.
4- Check the “Keep Prices” Checkbox to freeze the Prices of Pallet Grouped Items. This option will allow the user to assign prices different than the pallet prices (Price B, See Item Setup, Pallet Groups Setup)
Add Payments to Invoice
1- Reference Number. Enter in here the check number, Credit Card confirmation Number or any other reference number for this payment. Even if this is a cash transaction you need to enter an alphanumerical value in here.
2- Amount. Enter in here the amount of the payment. This has to be a positive number with two decimal places
3- Payment Method. Select the appropriate payment method from the list. If you need to select a payment method that does not exists in the company, you can always add it to the Setup Payment Methods screen (See Setup Payment Methods)
4- Bank Account. Select the appropriate bank account where this payment will be deposited.
5- Balance Due. This number will reflect the difference between the total and the Amount
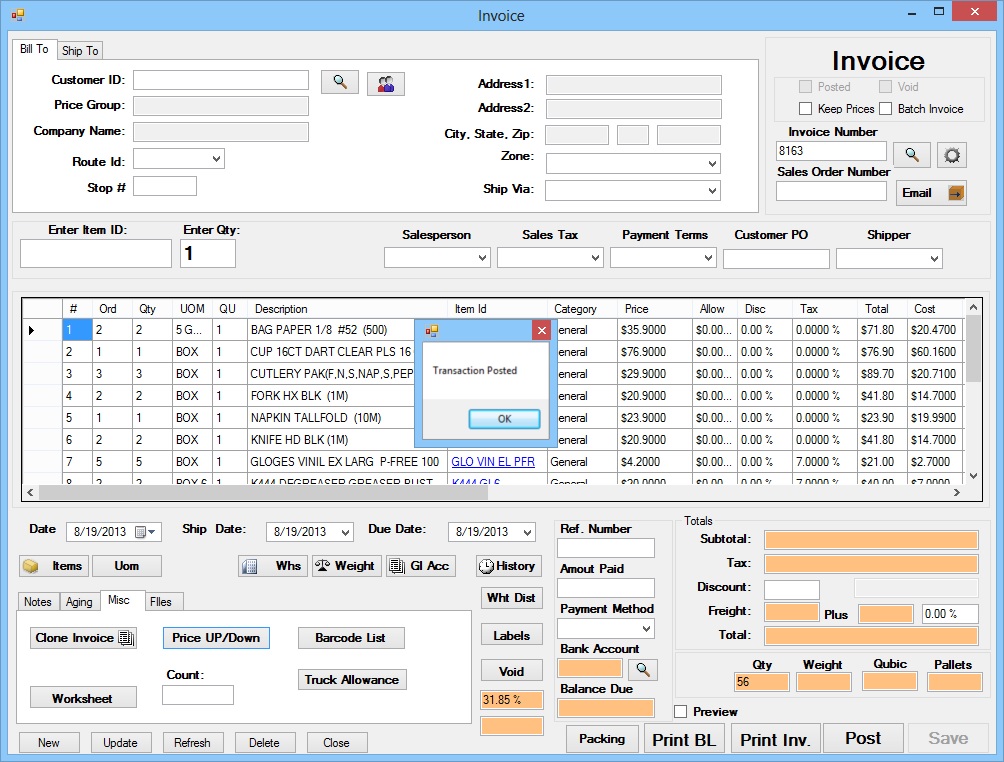
Post / Void Invoice
1- Click the post button if you are sure about posting the invoice. The system will ask you for confirmation. If you click yes, the system will check for possible flaws in the invoice like items with no warehouse/Bin, incomplete weight information for catch weight Items, and excessive credit request by this customer among others. After the invoice is posted you get a confirmation message. You cannot make any changes to a posted invoice except to void it.
2- Click the Void button to void the invoice if it was already posted and you want to revert the changes. After you void the Invoice, you still cannot make any changes to it. You would need to create a new transaction to invoice this customer for the right items.
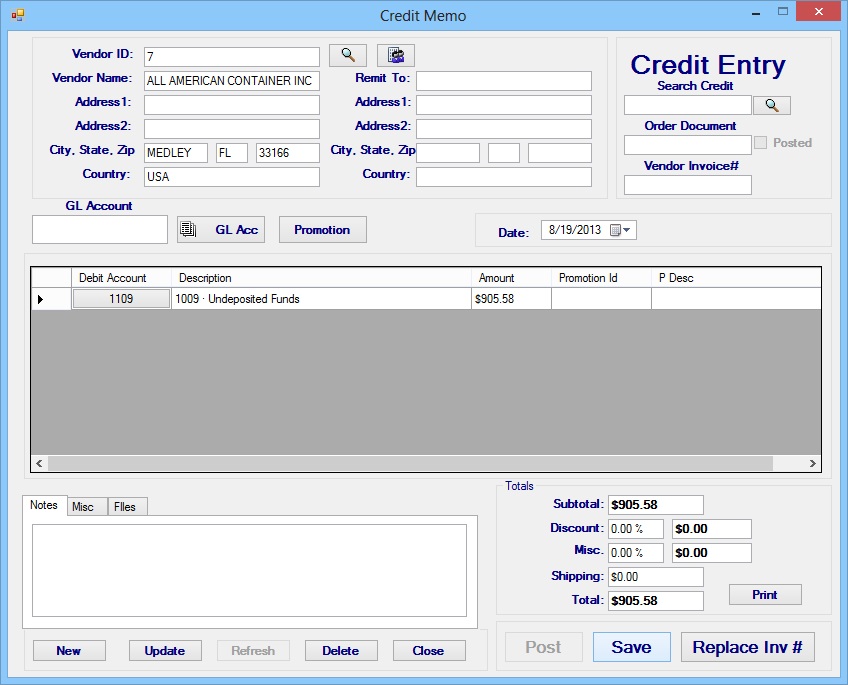
Create a New Credit Memo
Go to the main menu and Click on Sales/Credit Memo
1. Press the New Button in the Lower left hand side of the screen. This will clear all contents from the form and position the cursor over the customer search button. If you have an unsaved Credit Memo when you click new, the system will prompt you to save the data before continue
2. The “Date” field will show today’s date by default. However, you can change that information by clicking in the date/time picker selection button
3. Search for a customer either by pressing the Yellow Folder Button or entering the customer Id in the text box and pressing enter.
4. When you bring the customer information to the screen all the Bill To/Ship to fields are filled with the customer information
5. If you want to edit the customer information or you need to add a new customer to the company, click the “Red Notebook” button to open the customer setup form (See Customer Setup)
6. The Salesperson comes from the selected customer’s information. You can change these fields by selecting alternative options from the combo box.
7. Enter any customer reference number (if available) in the “Reference” field
8. To add Accounts Directly to the Credit Memo, enter the Account Number below the “GL Account” label, press Enter and the system will query the database for that account. If the account is found, it is added to the grid below. If the Item is not found the GL Accounts search screen will open.
9. The GL Accounts search screen can also be opened either by pressing the “GL Acc” button on the Credit Memo. This form will allow you to search for an Item based on the Account Number, Description or Type. Once you find the Account you are searching for you can press the select button to bring it to the Credit Memo.
10. After the user has added an account to the Grid, he/she needs to fill the Description Columns with the Appropriate Information. This can be a brief explanation as to why that account is being debited.
11. The user also has to enter the amount that he/she wants to debit for each of the accounts added to the grid. Those amounts will be totaled at the bottom of the form and that’s what will be credited to the customer’s AR account.
12. Before Saving, Updating or posting the user can enter a discount percentage that will be applied to the subtotal of the Credit Memo.
13. When all the information is in place, Press the Save Button to complete the Credit Memo and assign a Credit Memo number. This action is not going to affect any Inventory levels in the company. The Accounts Receivable and all of the other accounts involved won’t be affected until the Credit Memo is posted.
14. Credit Memo Report: Press the "Print" button to print a report that includes the customer Information, the accounts involved and the total that will be credited to the customer AR Account. You can use this report as a receipt that you can send to your customers.
15. Click the post button if you are sure about posting the Credit Memo. The system will ask you for confirmation. If you click yes, the system will check for possible flaws in the Credit Memo like Accounts with no description or amount zero. After the Credit Memo is posted you get a confirmation message. You cannot make any changes to a posted Credit Memo except to void it. This action won’t affect any inventory information. It will decrease the Accounts Receivable balance for the selected customer. The user will need to apply this Credit Memo to the appropriate Invoices, Beginning Balances or Sales Memos using the Cash Receipts form.
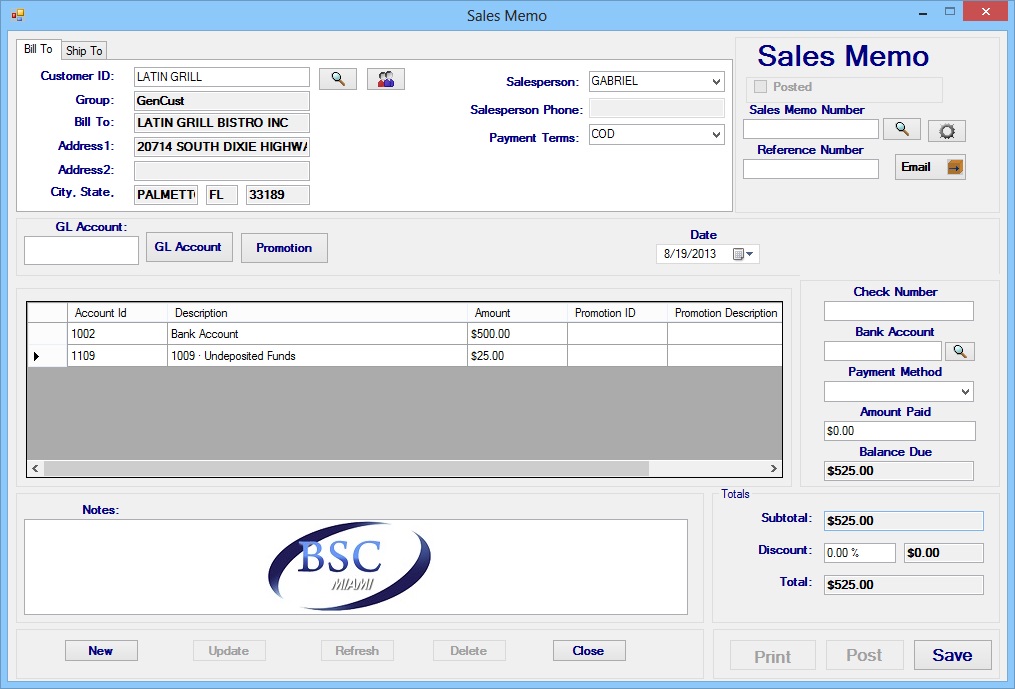
Create a New Sales Memo
Go to the main menu and Click on Sales/Sales Memo
1. Press the New Button in the Lower left hand side of the screen. This will clear all contents from the form and position the cursor over the customer search button. If you have an unsaved Sales Memo when you click new, the system will prompt you to save the data before continue
2. The “Date” field will show today’s date by default. However, you can change that information by clicking in the date/time picker selection button
3. Search for a customer either by pressing the Yellow Folder Button or entering the customer Id in the text box and pressing enter.
4. When you bring the customer information to the screen all the Bill To/Ship to fields are filled with the customer information
5. If you want to edit the customer information or you need to add a new customer to the company, click the “Red Notebook” button to open the customer setup form (See Customer Setup)
6. The Salesperson comes from the selected customer’s information. You can change these fields by selecting alternative options from the combo box.
7. Enter any customer reference number (if available) in the “Reference” field
8. To add Accounts Directly to the Sales Memo, enter the Account Number below the “GL Account” label, press Enter and the system will query the database for that account. If the account is found, it is added to the grid below. If the Item is not found the GL Accounts search screen will open.
9. The GL Accounts search screen can also be opened either by pressing the “GL Acc” button on the Sales Memo. This form will allow you to search for an Item based on the Account Number, Description or Type. Once you find the Account you are searching for you can press the select button to bring it to the Sales Memo.
10. After the user has added an account to the Grid, he/she needs to fill the Description Columns with the Appropriate Information. This can be a brief explanation as to why that account is being debited.
11. The user also has to enter the amount that he/she wants to credit for each of the accounts added to the grid. Those amounts will be totaled at the bottom of the form and that’s what will be debited to the customer’s AR account.
12. Before Saving, Updating or posting the user can enter a discount percentage that will be applied to the subtotal of the Sales Memo.
13. When all the information is in place, Press the Save Button to complete the Sales Memo and assign a Sales Memo number. This action is not going to affect any Inventory levels in the company. The Accounts Receivable and all of the other accounts involved won’t be affected until the Sales Memo is posted.
14. Sales Memo Report. Press the "Print" button to print a report that includes the customer Information, the accounts involved and the total that will be debited to the customer AR Account. You can use this report as a receipt that you can send to your customers.
15. Click the post button if you are sure about posting the Sales Memo. The system will ask you for confirmation. If you click yes, the system will check for possible flaws in the Sales Memo like Accounts with no description or amount zero. After the Sales Memo is posted you get a confirmation message. You cannot make any changes to a posted Sales Memo except to void it. This action won’t affect any inventory information. It will increase the Accounts Receivable balance for the selected customer. The user will be able to apply payments, Credit Memos and Returns to this Sales Memo using the Cash Receipts form.
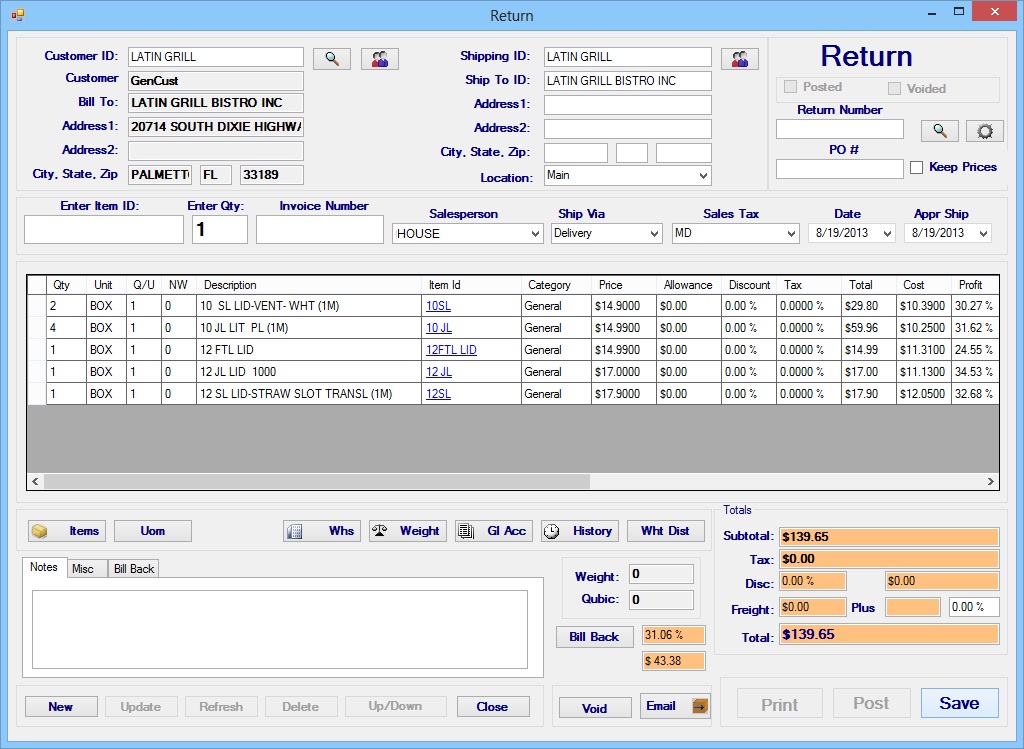
Create a New Return
Go to the main menu and Click on Sales/Return
1. Press the New Button in the Lower left hand side of the screen. This will clear all contents from the form and position the cursor over the customer search button. If you have an unsaved Return when you click new, the system will prompt you to save the data before continue
2. The Warehouse field is filled with the company’s default warehouse. If you want to ship your order from a different location, select the desired warehouse from the dropdown list
3. The “Order Date” and “Approximate Ship Date” will show today’s date by default. However, you can change that information by clicking in the date/time picker selection button
4. Search for a customer either by pressing the Yellow Folder Button or entering the customer Id in the text box and pressing enter.
5. When you bring the customer information to the screen all the Bill To/Ship to fields are filled with the customer information
6. You can press the Search Button to the right of the Ship To Fields to select and alternative ship to for this customer if available
7. If you want to edit the customer information or you need to add a new customer to the company, click the “Red Notebook” button to open the customer setup form (See Customer Setup)
8. The Payment Terms, Ship Via, Salesperson and Tax information comes from the selected customer’s information. You can change these fields by selecting alternative options from the combo box.
9. The cost markup box will show the customer’s default cost markup. Entering any value on this field greater than zero will assign any items to this Return according to that margin percentage over cost
10. If this sale is attributed to any special advertising campaign that you want to track, select that value from the list (See Advertisement Setup)
11. Enter any customer reference number (if available) like their PO number in the “Reference” field
12. Before you start adding Items, enter the Invoice number you are returning Items from. This will allow the system to bring the items in the return at the same price it was charged in that Invoice. If you leave this field blank, current prices will be used.
13. To add Items Directly to the Return, enter the Item Id or Product UPC below the “Enter Item Id” label, press Enter and the cursor will go to the Qty Field. Enter the desired Qty in there and press enter. The Return will query the database for that Item. If the Item is found, it is added to the grid below. If the Item is not found the search screen will open.
14. The search screen can be opened either by pressing the “Add Items” button on the Return or by not finding the Item ID/UPC in the direct entry box. This form will allow you to search for an Item based on the Item’s category, description, ID, UPC and Prefer Vendor. Once you find the Item or Items you are searching for you can check the ones you want to bring to the Return, Press the Select Button and close the search form.
15. The items are added to the grid with the pricing information that goes according to the Cost Markup entered above or the customer’s price list information. After the Item is added the user can change the Qty, Price, Discount %, Tax Percentage and weight. In addition to that, the user can also check the “To be Ordered Version” to trigger the creation of a PO for this Item. Furthermore, if the user checks the “Contract Price” option, the system will create a contract price for the combination of Item/UOM/Customer for a period of two months.( See contract Prices Setup)
16. If this Item is a Batch Controlled Item, you will be prompted to select from the list of batches for this Item and that information will show in the grid. If you decide to use a different batch just press the batch button in the desired line to open the Batch Selection screen again.
17. Click the “UOM” button to change the Unit of Measure of the selected line Item. After you select the desired UOM from the list, cost and price information for that line item will be updated accordingly.
18. When you select an Item, the Warehouse and Bin Information come based on the “Location” for the Return and the Bins where that Item is stored in that warehouse. If the user wants to change the warehouse where the items are taken from, he/she needs to click the “WHS” button to open a list of available warehouses and Bins within those warehouses.
19. Press the “Weight” to open the Weight distribution Screen. In that screen you can enter the total weight and Save or you can add individual weights one by one. This will change the line item weight in the form and it will affect its line total. At the end of the line you can see a column with all the weight figures for this line Item
20. The History button shows you a lookup of all the items this customer purchased from you in a selected time period. The user can further that selection by filtering what items to bring based in the Date Range. Then the user can compare cost and price information from the history and if desired he/she can even bring items from that lookup to the Return Item grid.
21. When the user has added all items to the Return, he can add a discount % to the total. In addition to that the user can also add freight charges to this Return
22. When all the information is in place, Press the Save Button to complete the Return and assign an Return number. This action is not going to Increase the inventory on Hand or decrease the Accounts Receivable information. That is only done when the Return is posted.
23. Return Report. Press the "Print" button to print the Return report for this transaction.
24. Click the post button if you are sure about posting the Return. The system will ask you for confirmation. If you click yes, the system will check for possible flaws in the Return like items with no warehouse/Bin and incomplete weight information for catch weight Items among others. After the Return is posted you get a confirmation message. You cannot make any changes to a posted Return except to void it. This action will increase the inventory on hand for all the items involved. In addition to this it will affect the Total Weight for catch weight items. Finally, it will decrease the Accounts Receivable balance for the selected customer. The user will need to apply this return to the appropriate Invoice, Beginning Balances or Sales Memos using the Cash Receipts form.
Copyright © 2018 Business Software Consulting , Inc. All Rights Reserved.